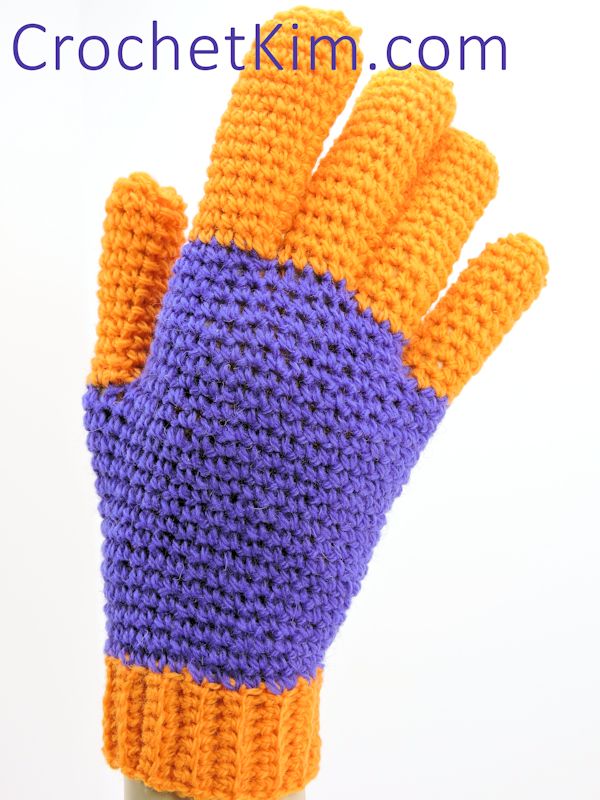
Jersey Gloves
designed by Kim Guzman © August 2015
Please read my Terms of Use
Technique: Regular Crochet
Finished size
To fit womens size small. It’s possible that they will stretch to a size medium.
The pattern will be easy to adjust to a larger size by sticking with the same numbers and using a slightly heavier yarn with a larger hook.
Finger length can be increased easily by simply adding extra rounds. None of these modifications have been tested, so yarn requirements are unknown. Don’t be afraid to experiment.
Materials
- Cascade 220 Fingering weight yarn (100% Peruvian Highland Wool, 273 yds per 50g): One hank of each color (or yardage specified):
- A: Color #7825 Orange Sherbert (approx. 120 yds)
- B: Color #7808 Purple Hyacinth (approx. 100 yds)
- Suggested hook: G-6 (4mm) (designated as “large” hook in pattern)
- Suggested hook: E-4 (3.5mm) (designated as “small” hook in pattern)
- Needle (for weaving ends)
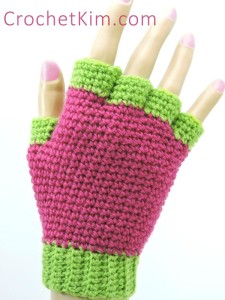
If you are looking for my Jersey Mitts with partial fingers, the pattern is available HERE.
Tip
Make these in sports team colors for a terrific gift!
Skill Level
Intermediate. Ordinarily, I would say that this pattern is pretty easy to accomplish. It’s all single crochet, but there are four different variations of single crochet used. A couple of testers did have a problem trying to wrap their heads around the finger separation but they were successful once I told them to just crochet exactly as indicated, without trying to figure out what was going on. So, in conclusion, if you will just crochet as indicated, without trying to figure it out in your head first, you will be fine.
Notes
Wrist Ribbing is worked first then stitches are picked up along the long edge in joined rounds.
It is very important that you count your stitches and that the first stitch is worked in the first stitch. Many times, I see crocheters inadvertently skip the first stitch then work into the slip stitch closing. This causes a shift in the stitches which will cause a pronounced diagonal seam. While there is nothing wrong with a diagonal seam, it may cause the finger spaces to be in the wrong place.
Small size hook is used for Wrist Ribbing. Large size hook is used for remainder.
I have called the gloves “First Glove” and “Second Glove”. If you are a right-handed crocheter, the First Glove instructions will produce a right hand glove. If you are a left-handed crocheter, the First Glove instructions will produce a left hand glove.
When working a row in back loops only, if your last stitch gets too loopy, work the last one under both loops.
Gauge
Ribbing piece measures 1.25″ and 5.5″ long, unstretched
Measured flat, 4.5″ wide and 3.5″ high, including ribbing, after round 13 of Hand
Special Stitches
Extended Single Crochet (esc): Insert hook in stitch indicated, yarn over, pull loop through, yarn over, pull through one loop on hook (chain made), yarn over, pull through two loops on hook.
Foundation Single Crochet (fsc): Insert hook in extra chain made at bottom of previous single crochet, yarn over, pull loop through, yarn over, pull through one loop on hook (chain made), yarn over, pull through two loops on hook.
Online Video Support
Right-Handed Foundation Single Crochet at End of Row
Left-Handed Foundation Single Crochet at End of Row
Instructions
First Glove
Wrist Ribbing
Row 1: With A and small hook, ch 9, sc in second ch from hook and in each remaining ch, turn: 8 sc.
Row 2: Ch 1, working in back loops only, sc across, turn: 8 sc.
Rows 3-37: Rep row 2, fasten off after final row. With needle, seam top of row 37 to bottom of row 1.
Hand
Round 1: Working along sides of rows of Ribbing, with large hook, join B with sl st in side of row 37, ch 1, sc in same position as joining, sc in side of each remaining row, sl st to first sc: 37 sc.
Round 2: Ch 1, 2 sc in first sc, sc in each remaining sc, sl st to first sc: 38 sc.
Round 3: Rep round 2: 39 sc.
Rounds 4-13: Ch 1, sc in each sc around, sl st to first sc: 39 sc.
Round 14: [Thumb Opening] Ch 1, sc in first sc, sc in next 29 sc, esc in next sc, 4 fsc, sk 8 sc, sl st to first sc: 35 sc.
Rounds 15-17: Ch 1, sc in each sc around, sl st to first sc: 35 sc.
Round 18: [Little Finger Opening] Ch 1, sc in first sc, sc in next 8 sc, esc in next sc, 3 fsc, sk 7 sc, sc in next 18 sc, sl st to first sc: 31 sc.
Rounds 19-20: Ch 1, sc in each sc around, sl st to first sc: 31 sc.
Round 21: [Ring Finger Opening] Ch 1, sc in first sc, sc in next 5 sc, esc in next sc, 3 fsc, sk 10 sc, sc in next 14 sc, sl st to first sc: 24 sc.
Round 22: [Middle Finger Opening] Ch 1, sc in first sc, sc in next 2 sc, esc in next sc, 3 fsc, sk 11 sc, sc in next 9 sc, sl st to first sc: 16 sc. Fasten off.
Note: Once you finish the middle finger opening, the opening for the pointer finger remains. You don’t have to do anything. It’s right there and open, ready for you to apply the stitches below. When separating, you only need to create the stitches between the four fingers, for a total of three. There is nothing to create for the pointer finger. Just go forth and conquer.
Fingers
Thumb
Round 1: With larger hook, join A with sl st in first skipped sc from Round 14 of Thumb Opening, ch 1, sc in 8 skipped sc, sc in bottom of each of 4 fsc, sl st to first sc: 12 sc.
Rounds 2-11: Ch 1, sc in each sc around, sl st to first sc.
Round 12: Ch 1, [sk sc, sc in next sc] around, sl st to first sc: 6 sc. Fasten off. Using needle, seam tops of stitches together.
Little Finger
Round 1: Rep as for Thumb on 10 sts.
Rounds 2-10: Ch 1, sc in each sc around, sl st to first sc.
Round 11: Ch 1, [sk sc, sc in next sc] around, sl st to first sc: 5 sc. Fasten off. Using needle, seam tops of stitches together.
Ring Finger
Round 1: Rep as for Thumb on 13 sts.
Rounds 2-13: Ch 1, sc in each sc around, sl st to first sc.
Round 14: Ch 1, sc in first sc, [sk sc, sc in next sc] around, sl st to first sc: 7 sc. Fasten off. Using needle, seam tops of stitches together.
Middle Finger
Round 1: Rep as for Thumb on 14 sts.
Rounds 2-15: Ch 1, sc in each sc around, sl st to first sc.
Round 16: Ch 1, [sk sc, sc in next sc] around, sl st to first sc: 7 sc. Fasten off. Using needle seam tops of stitches together.
Pointer Finger
Round 1: Rep as for Thumb on 16 sts.
Rounds 2-14: Ch 1, sc in each sc around, sl st to first sc.
Round 15: Ch 1, [sk sc, sc in next sc] around, sl st to first sc: 8 sc. Fasten off. Using needle seam tops of stitches together.
Second Glove
Repeat Wrist Ribbing and rounds 1-13 of Hand.
Round 14: [Thumb Opening] Sl st across next 8 sc, ch 1, sc in same sc as last sl st, sc in next 29 sc, esc in next sc, 4 fsc, sk 8 sl st, sl st to first sc: 35 sc.
Rounds 15-17: Ch 1, sc in each sc around, sl st to first sc: 35 sc.
Round 18: [Little Finger Opening] Ch 1, sc in first sc, sc in next 13 sc, esc in next sc, 3 fsc, sk 7 sc, sc in next 13 sc, sl st to first sc: 31 sc.
Rounds 19-20: Ch 1, sc in each sc around, sl st to first sc: 31 sc.
Round 21: [Ring Finger Opening] Ch 1, sc in first sc, sc in next 10 sc, esc in next sc, 3 fsc, sk 10 sc, sc in next 9 sc, sl st to first sc: 24 sc.
Round 22: [Middle Finger Opening] Ch 1, sc in first sc, sc in next 6 sc, esc in next sc, 3 fsc, sk 11 sc, sc in next 5 sc, sl st to first sc: 16 sc. Fasten off.
Repeat rounds for each Finger.
Finishing
With needle, weave in all ends securely. While weaving in ends, you may want to also close up any gaps between the stitches that naturally occur during the stitching. You can close up any gaps, but don’t close them up so tightly that you don’t allow movement.