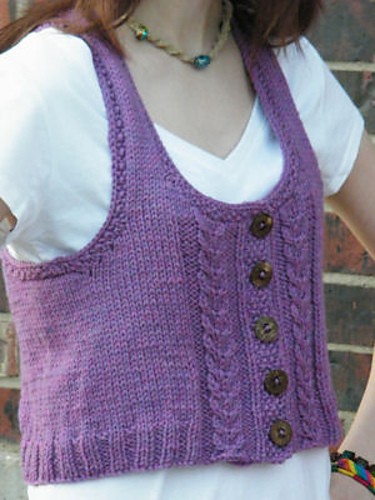
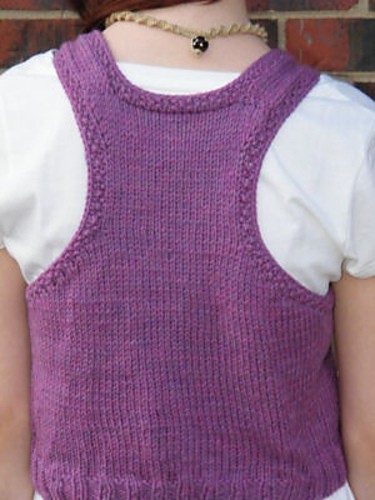
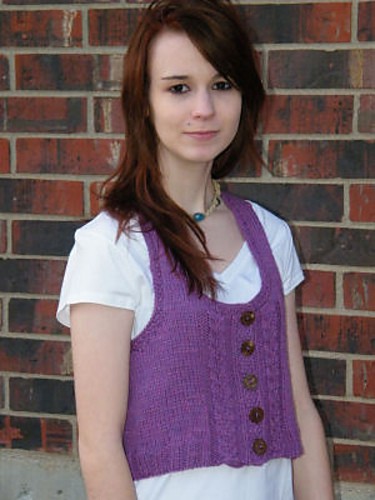
Liana Racerback Vest
designed by Kim Guzman © Oct. 2009 (republished Feb. 2018)
Please read my Terms of Use
Technique: Knit
Finished Sizes
Extra-Small (Small, Medium, Large). Suggested ease of 0 to -2.
To Fit Bust Sizes
28” (32”, 36”, 40”)
Materials
Cascade Yarns, The Heathers 220 (100% merino wool) 100g/3.5 oz/220 yds per hank: 255 (285, 315, 350, 390) yds (model made in color 2419)
Size 8/5mm 24” or larger circular needles (circular needles recommended in order to hold stitches) (or size needed to meet gauge)
Size 6/4mm 24” or larger circular needles (recommended for ribbing, button band and neckline trim; for armhole trim, 24” circular needles will be sufficient; dependent on individual knitter preferences, double-pointed needles can be used for armhole trim)
5 size 3/4” to 7/8” round buttons
4 Round stitch markers
Stitch holders or waste yarn
Cable needle
Yarn needle (for weaving ends)
Optional: Sewing needle and thread (for use in sewing buttons if the holes in the buttons are too small for the yarn)
Gauge
In Stockinette stitch with larger needles, 18 sts and 24 rows measures 4”
Abbreviations
BO=bind off; cn=cable needle; dec=decrease; g=grams; inc=increase; k=knit; k2tog=knit two together; oz=ounces; p=purl; p2tog=purl two together; patt=pattern (i.e., stitch pattern); RS=right side; rem=remaining; rep=repeat; st(s)=stitch(es); St st=stockinette stitch; WS=wrong side; yds=yards; yo=yarn over
Stitch Patterns
Stockinette stitch pattern (St st): Knit right side rows and purl wrong side rows.
Reverse Stockinette stitch pattern: Purl right side rows and Knit wrong side rows.
Ribbing stitch pattern (Rib patt): Knit the knit sts and purl the purl sts (as they face you).
Seed stitch pattern (Seed patt): Row 1: [k1, p1] across. (When an odd number of sts, end with k1.) Row 2: Knit the purl sts and purl the knit sts (as they face you).
Cable stitch pattern (Cable patt):
Row 1 (RS): P3, k6, p3.
Row 2: K3, p6, k3.
Row 3: P3, sl 2 sts to cn and hold to back, k1, k2 from cn, sl 1 st to cn and hold to front, k2, k1 from cn, p3.
Row 4: K3, p6, k3.
Rep rows 1-4 for stitch pattern.
Pattern Notes
To decrease at beginning or end of row: Knit or purl 2 together (or preferred method).
To increase at beginning of row: Knit the first st as normal, increase by knitting into the st below the next st and then the next st as normal (or preferred method).
To increase at ending of row: Work across as directed to last st, increase by knitting into the st below the last st, then into the last st as normal (or preferred method).
To bind off: Bind off in knit, unless otherwise instructed.
When picking up stitches: Along bound-off stitches and around sides of rows where there is a curve (like the curved area along the armhole), pick up a stitch in every stitch or side of row. For straight edges, along sides of rows (like the straight edges of the armhole and button band), pick up a stitch in every 3 of 4 rows.
Garment is worked from the bottom to shoulders in one piece, split at the armholes. Minimal seaming at shoulders. The seaming is not actually at the very top of the shoulder. It is approximately 2” down the back from the top of the shoulder.
Free Knit Pattern Begins Here
Instructions
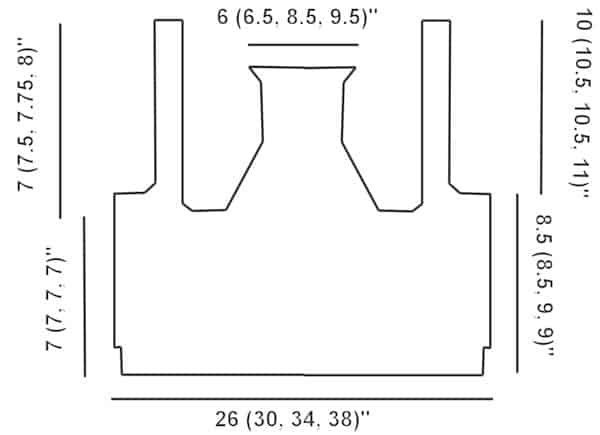
With smaller needles, cast on 126 (142, 162, 178).
Row 1 (WS): P2, place marker, k3, p6, k3, place marker, [p2, k2] across to last 16 sts, p2, place marker, k3, p6, k3, place marker, p2.
Row 2: St st to marker, Cable patt (beginning with row 1) to next marker, Rib patt to next marker, Cable patt to next marker, St st to end.
Rep previous row until piece measures 1.75”.
Next row: St st to marker, Cable patt to next marker, St st to next marker, Cable patt to next marker, St st to end.
Switch to larger needles and continue until piece measures 7 (7, 7, 7)” from bottom of hem, ending with WS row.
Split for Armholes
Next row (RS): Maintaining established stitch pattern throughout until instructed otherwise, work across 25 (28, 32, 35) sts only, turn, placing rem sts on stitch holder or waste yarn.
Next row: Work across with dec 1 st at armhole edge—24 (27, 31, 34) sts.
Rep previous row 3 (5, 5, 6) times more. On final row—21 (22, 26, 28) sts.
Work even until piece measures 8.5 (8.5, 9, 9)” from bottom of hem, ending with WS row. Note: To “work even” means to continue working on the established number of sts with no increasing or decreasing.
Neckline
Next row: BO 7 (8, 12, 14) sts, St st across rem sts—14 sts.
Next row: Work across with dec 1 st at neckline—13 sts.
Rep previous row 5 times more. On final row—8 sts.
Work even in St st until piece measures 18.5 (19, 19.5, 20)” from bottom of hem, ending with WS row, BO.
Back
Next row: With RS facing, remove next 66 (74, 84, 92) sts from stitch holder or waste yarn and place on larger needle, BO 10 (12, 14, 16) sts, k across rem sts—56 (62, 70, 76) sts.
Next row: St st across with 1 dec at beg and at end of row—54 (60, 68, 74) sts.
Rep previous row 17 (19, 19, 20) times more. On final row, 20 (22, 30, 34) sts.
Work even until piece measures 12.5 (13, 13.25, 13.5)” from bottom of hem, ending with WS row.
Next row: St st across with 1 inc at beg and at end of row—22 (24, 32, 36) sts.
Next row: St st across.
Rep previous two rows 3 times more. On final row, 28 (30, 38, 44), BO.
Opposite Front
Next row: With RS facing, remove last 35 (40, 46, 51) sts from stitch holder or waste yarn and place on larger needle, BO 10 (12, 14, 16) sts, work across in established stitch pattern here and throughout, until instructed otherwise—25 (28, 32, 35) sts.
Next row: Work across with dec 1 st at armhole edge—24 (27, 31, 34) sts.
Rep previous row 3 (5, 5, 6) times more. On final row—21 (22, 26, 28) sts.
Work even until piece measures 8.5 (8.5, 9, 9)” from bottom of hem, ending with WS row.
Neckline
Next row: Work even.
Next row: BO 7 (8, 12, 14) sts in purl, p across rem sts—14 sts.
Next row: St st across with dec 1 st at neckline—13 sts.
Rep previous row 5 times more. On final row—8 sts.
Work even in St st until piece measures 18.5 (19, 19.5, 20)” from bottom of hem, ending with WS row, BO.
Seaming
Seam last row of fronts, matching stitch for stitch, to the last row of back.
Armhole Trim
With smaller needles and RS facing, pick up sts around armhole. Begin working in the round. Use a stitch marker to mark the beginning of each round.
Rnds 1-3: Work in Seed patt. BO after last rnd.
Rep for opposite armhole.
Left Front Button Band
With smaller needles and RS facing, pick up sts along straight edge. Take note of the number of sts to ensure that you pick up the same number of sts when working on the Right Front.
Rows 1-7: Work in Seed patt. BO after final row.
Right Front Button Band
With smaller needles and RS facing, pick up the noted number of sts along opposite straight edge.
Rows 1-3: Work in Seed patt.
Row 4: Mark buttonhole positions ¼” from top and ¼” from bottom. Mark 3 remaining buttonhole positions evenly-spaced along button band. Work row as for Seed patt, except at buttonhole positions [yo, k2tog]. Note that, in order to maintain Seed patt, the buttonhole is always worked after a knit stitch as it is placed in patt.
Rows 5-7: Work in Seed patt. BO after final row.
Neckline Trim
With smaller needles and RS facing, pick up sts along tops of Buttonbands and around entire neckline.
Rows 1-3: Work in Seed patt. BO after last row.
Blocking
Immerse garment completely in cool water. Gently squeeze out water. Roll in dry towel to remove excess water. Lie garment flat and shape as it will be worn. Allow to dry completely.
Finishing
Sew on buttons adjacent to buttonholes. Weave in all ends carefully.