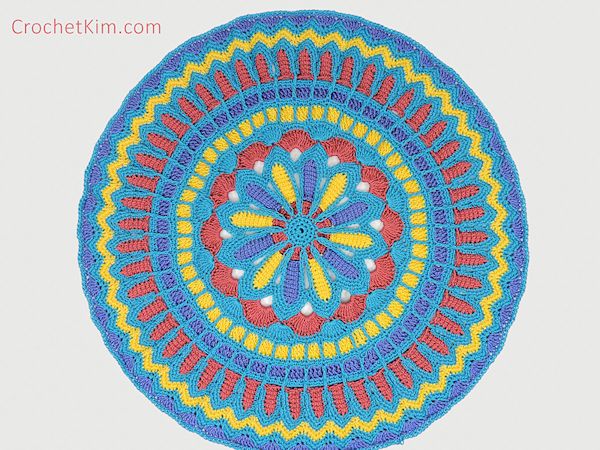
Turquoise Mandala Doily Part 2
designed by Kim Guzman © June 2015
Please read my Terms of Use
Technique: Regular Crochet
Finished size
17″ across (after Part 2)
Materials
- Valley Yarns 5/2 mercerized cotton, 2194 algiers blue (A), 3853 tea rose (B), 6319 blue iris (C), 1205 banana (D)
- Suggested hook: E-4 (3.5mm)
- Needle (for weaving ends)
Notes
Approx. yardage is as follows: 240 yds (A), 175 yds (B), 100 yds (C), 100 yds (D). All yardage amounts are estimates only.
This project has only been tested in size 5 cotton thread. Please feel free to try it with any thread/yarn you like, but I’m unsure of how different weights/fibers will react and can’t guarantee anything. Using a different material will mean different yardages will be required. Update: I have attempted this pattern with Red Heart Super Saver and can’t even get past round 4 without making adjustments. It can be done, but adjustments in count may definitely be required.
Due to popularity, I am making this project available as soon as I can, but it means that I will have to make it available in parts. I am still working on this design and hope to add more to it as I want it to fit my dining room table. I’m just a bit stumped on how to complete the next rounds the way I want them. If I continue, there will be a Part 3. You will want to follow me on social media or subscribe to my blog if you would like to be notified when there is more available.
Gauge
After round 4, approx. 2.25″ across
Special Stitches
Beginning Linked Treble Crochet (bltr): Sk first ch, [insert hook in next ch, yo, pull lp through] 3 times, [yo, pull through 2 lps on hook] 3 times.
Linked Treble Crochet (ltr): [Insert hook in horizontal bar on side of prev st, yo, pull lp through] 2 times, insert hook in next ch, yo, pull lp through, [yo, pull through 2 lps on hook] 3 times.
Single Crochet Two Together (sc2tog): Insert hook in st indicated, yo, pull lp through, insert hook in next st, yo, pull lp through, yo, pull through 3 lps on hook.
Crochet Pattern Instructions
Rounds 1-18: Click HERE.
Round 19: With B, join with sl st to top of last stitch of round 18 (not the first stitch), *ch 10, bltr, ltr in each remaining ch, sk 3 sc from round 18, sl st to next sc (7-ltr petal made), rep from *, until 48 petals are created, ending with sl st in first sl st. (stitch count: 48 7-ltr petals created) Fasten off B.
Round 20: With A, join with sl st to bottom of any petal on foundation row side (where you did your initial ch 10), ch 1, *sk ltr at bottom of petal, 6 sc along side of petal, [2 sc in unused loop of chain at top of petal] 2 times, 6 sc along opposite side of petal, sk last ltr of petal (the same one skipped previously), fptr around corresponding tr of round 17, rep from * around each of 48 petals, sl st to first sc.
Round 21: Sl st in next 2 sc, ch 1, *sc in next 5 sc, ch 1, sc in next 5 sc, sk 7 sts, rep from * until all petals completed, sl st to first sc.
Round 22: Sl st in next sc, ch 1, *sc in next 3 sc, 3 sc in ch-1 sp, sc in next 3 sc, sk 4 sc, rep from * until all petals completed, sl st to first sc. Fasten off A.
Round 23: Join D with sl st to 2nd sc of 3-sc group at top of any petal, ch 1, 3 sc in same st as joining, *sc in next 2 sc, [sc2tog across next 2 sc] 2 times, sc in next 2 sc, 3 sc in next sc, rep from * until last petal completed, sc in next 2 sc, [sc2tog across next 2 sc] 2 times, sc in next 2 sc, sl st to first sc.
Round 24: Ch 1, sc in same sc as joining, 3 sc in next sc, *sc in next 2 sc, [sc2tog across next 2 sc] 2 times, sc in next 2 sc, 3 sc in next sc, rep from * until last petal completed, sc in next 2 sc, [sc2tog across next 2 sc] 2 times, sc in next sc, sl st to first sc. Fasten off D.
Rounds 25-26: With A, rep rounds 23-24.
Round 27: Join C with sl st to 2nd sc of 3-sc group at top of any petal, ch 1, sc in same st as joining, *[3 dc in sc2tog] 2 times, sc in next 2nd sc of 3-sc group at top of next petal, rep from * to last petal, [3 dc in sc2tog] 2 times, sl st to first sc. Fasten off C.
Round 28: Join A with sl st to any sc, ch 1, sc in same st as joining and in each remaining st around, sl st to first sc. Fasten off A.
Finishing
With needle, weave in loose ends carefully.
Note: This completes the project as pictured. When I am able to complete the project, I will post part 3. The photo at the top of this page goes through round 28 and the instructions are provided above. You do not need anything more in order to create what is in the photo. Yes, I would like to continue working on this project, but I can’t provide any instructions for what I haven’t done. I do not know when I will be able to continue working on this project. This is all I have right now.