
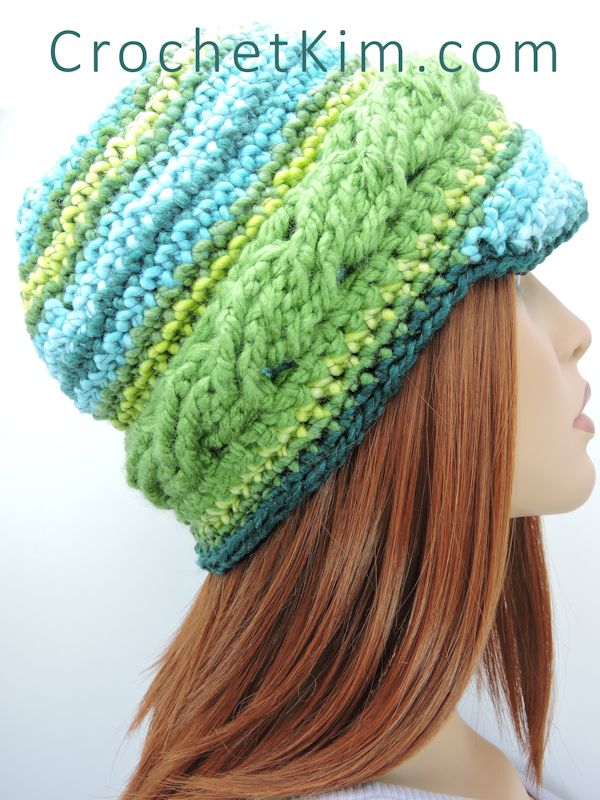
Braided Brim Beanie
designed by Kim Guzman © Sept. 2015
Please read my Terms of Use
Technique: Regular Crochet
Finished size
Hat body 25″, at band 20″ (stretchy), height 8.5″ (not including sun brim)
The hat band will stretch to accommodate about 23″ head circumference when working to gauge. If you need a bigger size, you can try as follows: 1) do one more round of increasing in hat body to bring stitch count to 72 sc, 2) work about 3 more rounds of hat height, and 3) work 4 more rows of band with 72 sc along the edge. This hasn’t been tested so I don’t know how much more yardage would be required. One skein of B is more than sufficient, but I don’t know whether one skein of A will be enough.
The hat has a slight slouch in the back. To make it less slouchy, reduce the number of rounds in the body height.
Materials
- 1 skein: (A) Yarn Bee “First Love” (size 5 bulky, 100% polyester, 143 yds per 5 oz) shown in Turquoise Multi
- 1 skein: (B) Hobby Lobby “I Love This Chunky!” (size 5 bulky, 100% acrylic, 109 yds per 3.5 oz) shown in Fern
- Suggested hook sizes: L-11 [8mm] (larger hook) and 7mm (smaller hook)
- Stitch marker (or small piece of scrap yarn)
- Needle (for weaving ends and seaming brim)
Skill Level
Intermediate
Notes
Hat is worked top-down, in unjoined rounds, braided band is worked separately and applied once the hat body is finished, then the sun brim is made.
Each round is worked in spiral fashion, without joining rounds. Use a stitch marker or scrap piece of yarn to mark the last stitch of each round so you won’t lose your place in the round.
Gauge
After round 7, approx. 5″
After round 11, approx. 7.5″
After round 23, flat measurement 12.5″, height 7.5″
Braided Band measures approximately 2″ x 5″ after row 8. After completion, length is approximately 20″ and is stretchy.
Special Stitches
Back Post Double Crochet (bpdc): Yarn over, with hook in back of work, insert hook to the side of the indicated stitch, move hook around the front of the stitch and out the other side of the same stitch (hook is in back of work again), yarn over, pull loop through, [yarn over, pull through 2 loops on hook] twice.
Front Post Treble Crochet (fptr): Yarn over twice, insert hook to the side of the indicated stitch, move hook around the back of the stitch and out the other side of same stitch, yarn over, pull loop through, [yarn over, pull through 2 loops on hook] 3 times.
Crochet Pattern Instructions
Rnd 1: With A and larger hook, ch 2, 4 sc in 2nd ch from hook.
Rnd 2: 2 sc in each sc around: 8 sc.
Rnd 3: 2 sc in each sc around: 16 sc.
Rnd 4: [Sc in next sc, 2 sc in next sc] around: 24 sc.
Rnd 5: [Sc in each of next 2 sc, 2 sc in next sc] around: 32 sc.
Rnd 6: Sc in each sc around: 32 sc.
Rnd 7: [Sc in each of next 3 sc, 2 sc in next sc] around: 40 sc.
Rnd 8: Rep rnd 6: 40 sc.
Rnd 9: [Sc in each of next 4 sc, 2 sc in next sc] around: 48 sc.
Rnd 10: Rep rnd 6: 48 sc.
Rnd 11: [Sc in each of next 5 sc, 2 sc in next sc] around: 56 sc.
Rnd 12: Rep rnd 6: 56 sc.
Rnd 13: [Sc in each of next 6 sc, 2 sc in next sc] around: 64 sc.
Rnds 14-23: Rep rnd 6: 64 sc. Set aside. Do not fasten off.
Braided Band
Row 1 (RS): With B and smaller hook, ch 7, hdc in third ch from hook and in each remaining ch, turn: 5 hdc.
Row 2: Ch 2, sk first hdc, bpdc in next 4 hdc, hdc in top of ch-2 turning ch, turn.
Row 3: Ch 2, sk hdc and 2 dc, fptr around next 2 dc, working in front of previous 2 fptr, fptr around 2 skipped dc, hdc in top of ch-2 turning ch, turn.
Tip: For the row after a cable crossing, use care that you don’t uncross the stitches. It helps to “feel” the stitches to ensure correct placement.
Row 4: Ch 2, sk first hdc, bpdc in next 4 fptr, hdc in top of ch-2 turning ch, turn.
Rows 5-32: Rep rows 3-4 consecutively.
Row 33: Turn strip with WS facing you to begin working along the sides of the rows. Still with smaller hook, ch 1, work 2 sc in side of each row, fasten off: 64 sc. With yarn needle, seam the short ends together to form a loop.
Attaching Band to Hat
Round 24: Slip Band over the top of hat and position it at round 23 of hat with row 33 of Band facing the bottom of the hat. This will be the back of the hat, so you may want to place the seam at this position. With larger hook and A, sc in each sc around working in both the Band and the Hat simultaneously, working through both fabrics at the same time, sl st to first sc: 64 sc.
Sun Brim
Row 1 (RS): Still with A and larger hook, ch 1, sc in same sc as joining and in next 44 sc, turn, leaving remaining sc unworked.
Row 2: Ch 1, sk sc, sc in next 23 sc, sk sc, sc in next sc, turn, leaving remaining sc unworked: 24 sc.
Row 3: Ch 1, sk sc, sc in next 21 sc, sk sc, sc in next sc, turn: 22 sc.
Row 4: Ch 1, sk sc, sc in next 19 sc, sk sc, sc in next sc, turn: 20 sc.
Row 5: Ch 1, sk sc, sc in next 17 sc, sk sc, sc in next sc, turn: 18 sc.
Row 6: Ch 1, sk sc, sc in next 15 sc, sk sc, sc in next sc, fasten off: 16 sc.
Row 7: Join A with sl st to the first unworked sc from row 1 of Sun Brim, sc in same sc as joining and next 18 sc to complete a full round, sl st to next sc.
Round 8: Ch 1, sc in first and next 18 sc, sc in sides of 4 rows of Brim, sc in next 16 sc, sc in sides of 4 rows, sc in next 19 sc, sl st to first sc, fasten off.
Finishing
Weave in all ends securely.