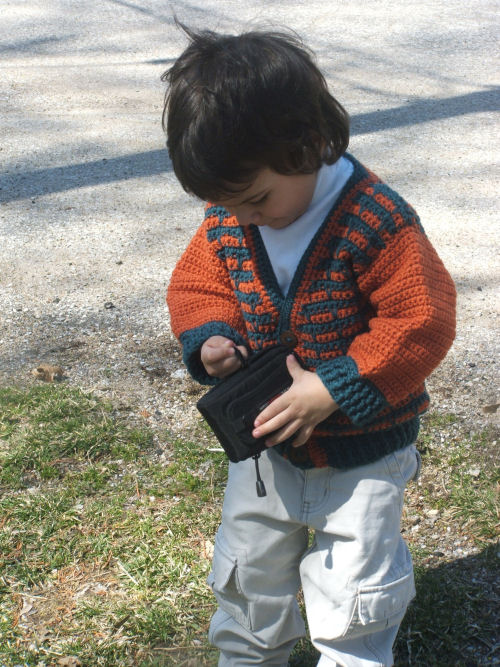
Jacob Child’s Jacket
designed by Kim Guzman © Sep. 2014
Please read my Terms of Use
Technique: Regular Crochet
A child’s crochet button-front jacket suitable for a boy or girl.
You may also like the Joseph Child’s Sweater HERE
Materials
- Sirdar Snuggly DK (50g/1.76 oz/176 yds per ball, 55% nylon/45% acrylic) used in sample:
2 (3, 3, 3, 4) balls 348 Cadet Blue (A) and 2 (2, 2, 3, 4) balls 357 Burnt Orange (B) - Suggested hook sizes: F (3.75mm) small hook, G (4.5mm) medium hook and H (5mm) large hook
- Tapestry needle (for weaving ends)
- 5 (5, 5, 5, 6) round size 7/8″ buttons)
Yarn Suggestion: Berroco Weekend DK
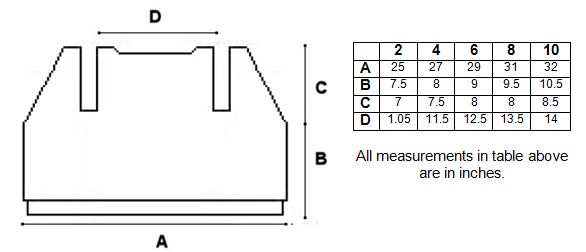
Finished Sizes
Instructions are written for child sizes 2 (4, 6, 8 and 10). Model is made in size 2.
To Fit Chest Sizes
21 (23, 25, 26.5, 28)”
Finished Chest Garment Measurements
26 (28, 30, 32, 33)”
Gauge
With larger hook, in garment stitch pattern, 13 sts for 18 rows measures 4″.
Special Stitches
Front Post Double Crochet (FPdc): Yarn over, insert hook from side of indicated stitch, going around the back of indicated stitch and from back to front on opposite side of indicated stitch, yarn over, pull loop through (3 loops on hook), continue double crochet normally.
Back Post Double Crochet (BPdc): Yarn over, insert hook from back to front at side of indicated stitch, going around the front of indicated stitch and from front to back on opposite side of indicated stitch, yarn over, pull loop through (3 loops on hook), continue double crochet normally.
Single Crochet 2 Together (sc2tog): Insert hook in st indicated, yo, pull lp through, insert hook in next st, yo, pull lp through, yo, pull through 3 lps on hook.
Long Single Crochet (Long sc): Sk current row and row below, insert hook from front to back in corresponding sc in next row, yo, pull lp through, pull up sufficiently to bring even with your work to avoid buckling of fabric, yo, pull through 2 lps on hook. Note: It is easy to determine placement of this stitch in this stitch pattern because it will be the first available row of Color A.
Notes
To maintain established stitch pattern: once the stitch pattern is established of Long Single Crochet, you will need to adjust the stitch pattern as necessary when making increases and decreases.
Body of garment is made in one piece, worked from hem to armhole, then split for the fronts and back. Sleeves are made separately and seamed.
Crochet Pattern Instructions
Stitch Patterns (Some sizes will use Stitch Pattern I and some sizes will use Stitch Pattern II.)
Stitch Pattern I
Row 4: [RS] Ch 1, *sc in each of next 3 sc, Long sc, rep from * to last 3 sc, sc in each of last 3 sc, turn.
Rows 5-7: Ch 1, sc across, turn.
Rep rows 4-7 for pattern.
Stitch Pattern II
Row 4: [RS] Ch 1, sc in each of next 4 sc, *Long sc, sc in each of next 3 sc, rep from * to last 5 sc, Long sc, sc in each of last 4 sc, turn.
Rows 5-7: Ch 1, sc across, turn.
Rep rows 4-7 for pattern.
Instructions
Ribbing
Row 1: With A and small hook, ch 86 (92, 98, 104, 108), dc in fourth ch from hook and in each rem ch across, turn–84 (90, 96, 102, 106) dc. (Skipped ch 3 at beginning of row counts as first dc.)
Row 2: Ch 2, sk first st, *FPdc around next dc, BPdc around next dc, rep from * to last dc, hdc in last dc, turn.
Rep previous row 3 (3, 5, 5, 9) times more, switching to B on final row.
Begin Body
Note Color changes will occur every two rows throughout.
Row 1: With B and large hook, ch 1, sc across to last st, turn, leaving last st unworked–83 (89, 95, 101, 105) sc.
Row 2: Ch 1, sc across, turn, changing to A.
Row 3: With A, ch 1, sc across, turn.
Rows 4-31 (33, 35, 39, 37): Begin working in Stitch Pattern I (II, I, II, II), beginning with Row 4 of Stitch Pattern, changing color every two rows as established.
Begin V-Neck Shaping
Row 1: Ch 1, sc2tog, cont to last 2 sc, sc2tog, turn–81 (87, 93, 99, 103) sc.
Row 2: Ch 1, sc across, turn.
First Front
Row 1: Ch 1, sc2tog, sc in each of next 12 (13, 15, 16, 17) sc, turn, leaving rem sc unworked–13 (14, 16, 17, 18) sc.
Rows 2-4: Ch 1, sc across, turn.
Row 5: Ch 1, sc2tog, sc across, turn–12 (13, 15, 16, 17) sc.
Rep previous 4 rows 3 (2, 4, 4, 2) times more–9 (11, 11, 12, 15) sc.
Next 5 rows: Ch 1, sc across, turn.
Next row: Ch 1, sc2tog, sc across, turn–8 (10, 10, 11, 14) sc.
Rep previous 6 rows 1 (2, 1, 1, 3) times more–7 (8, 9, 10, 11) sc.
Cont on these 7 (8, 9, 10, 11) sts until 66 (70, 74, 78, 80) rows have been completed for Body. (Do not count Ribbing rows.) Cut off.
Shape Back
Row 1: Returning to row 33 (35, 37, 41, 39), sk 9 (9, 9, 9, 9) sc, join with sl st, ch 1, cont across 35 (39, 41, 45, 47) sc only, turn, leaving rem sc unworked–35 (39, 41, 45, 47) sc.
Cont on these 35 (39, 41, 45, 47) sts until 63 (67, 71, 75, 77) rows have been completed for Body. (Do not count Ribbing rows.) Do not cut off.
Shape Shoulder
Row 1: Ch 1, sc across 7 (8, 9, 10, 11) sc only, turn, leaving rem sc unworked–7 (8, 9, 10, 11) sc.
Rows 2-3: Ch 1, sc across, turn. Cut off.
Opposite Shoulder
Row 1: Count across 7 (8, 9, 10, 11) sc from opposite armhole edge, join yarn with sl st, ch 1, sc across, turn–7 (8, 9, 10, 11) sc.
Rows 2-3: Ch 1, sc across, turn. Cut off.
Second Front
Row 1: Returning to row 33 (35, 37, 41, 39), sk 9 (9, 9, 9, 9) sc, join with sl st, ch 1, sc in each of next 11 (12, 14, 15, 16) sc, sc2tog across last 2 sc, turn–13 (14, 16, 17, 18) sc.
Rows 2-4: Ch 1, sc across, turn.
Row 5: Ch 1, sc across to last 2 sc, sc2tog, turn–12 (13, 15, 16, 17) sc.
Rep prev 4 rows 3 (2, 4, 4, 2) times more–9 (11, 11, 12, 15) sc.
Next 5 rows: Ch 1, sc across, turn.
Next row: Ch 1, sc across to last 2 sc, sc2tog, turn–8 (10, 10, 11, 14) sc.
Rep prev 6 rows (1, 2, 1, 1, 3) times more–7 (8, 9, 10, 11) sc.
Cont on these 7 (8, 9, 10, 11) sts until 66 (70, 74, 78, 80) rows have been completed from Body. (Do not count Ribbing rows.) Cut off.
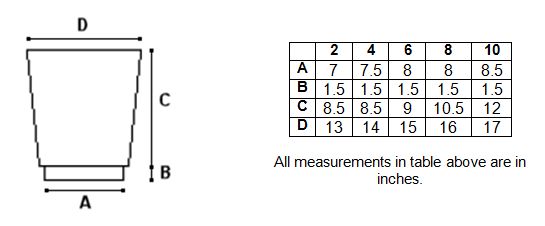
Sleeve (Make 2)
Ribbing
Row 1: With small hook and A, ch 40 (42, 44, 44, 46), dc in fourth ch from hook and in each rem ch across, turn–38 (40, 42, 42, 44) dc. (Skipped ch 3 at beginning of row counts as first dc.)
Row 2: Ch 2, sk first st, *FPdc around next dc, BPdc around next dc, rep from * to last dc, hdc in last dc, turn.
Rep previous row 3 (3, 3, 3, 3) times more.
Continue Sleeve
Row 1: With large hook and still with A, ch 1, sc in each st across, turn, switching to B–38 (40, 42, 42, 44) sc.
Next 13 (7, 9, 3, 3) rows: With B, ch 1, sc across, turn.
Next row: Ch 1, 2 sc in first sc, sc across to last sc, 2 sc in last sc, turn–40 (42, 44, 44, 46) sc.
Next 5 rows: Ch 1, sc across, turn.
Rep prev 6 rows 2 (3, 3, 5, 6) times more–44 (48, 50, 54, 58) sc.
Next row: Ch 1, 2 sc in first sc, sc across to last sc, 2 sc in last sc, turn–46 (50, 52, 56, 60) sc.
Next 2 rows: Ch 1, sc across, turn. Cut off.
Assembly
With yarn needle, seam shoulder and set in sleeves.
Button Band
Row 1: With RS facing you, with medium hook and B, join yarn with sl st to either corner of bottom front, ch 1, sc evenly across front, neck and opposite front, turn.
Row 2: Ch 1, sc in each sc, turn, cut off B.
Row 3: Mark positions for 5 (5, 5, 5, 6) evenly-spaced buttons on Left Front for boys or Right Front for girls, join A with sl st in same sc as last sc of Row 2, ch 1, sc in each sc, except at buttonhole positions, (ch 1, sk 2 sc), turn.
Row 4: Sc in each sc, except at buttonhole positions, 2 sc in each ch-1 sp, turn.
Row 5: Sc in each sc. Cut off.
Finishing
Attach buttons adjacent to buttonholes. Weave in all ends carefully and securely.