I love all the circle mandalas currently available in crochet and I wanted to design one of my own.
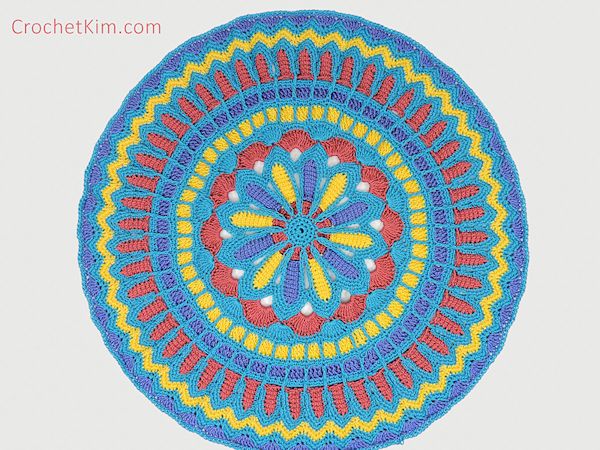
I got this far and I think I’ve worked out how I want to add on from here. I just need to work on the math.
You can get the free crochet pattern for this one on my website at the link in my profile. Hopefully I can figure out the math for more during the winter this year. I can’t wait to put it in the center of my table.
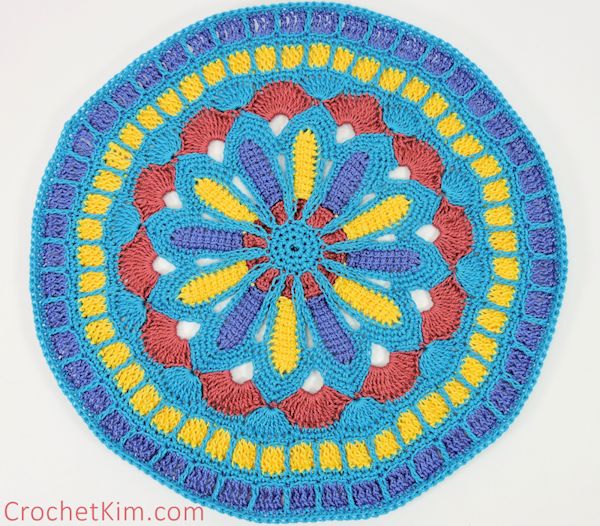
Turquoise Mandala Doily Part 1
Part 2 is available HERE.
designed by Kim Guzman © June 2015
Please read my Terms of Use
Technique: Regular Crochet
Finished size
12″ across (Part 1 only)
Materials
- Valley Yarns 5/2 mercerized cotton, 2194 algiers blue (A), 3853 tea rose (B), 6319 blue iris (C), 1205 banana (D)
- Suggested hook: E-4 (3.5mm)
- Needle (for weaving ends)
Notes
Unfortunately, I failed to weigh Part 1 of this project before I added to it. I can only give an estimate of the amount of thread used for the larger version and I can only say that you won’t need more than this amount for part 1. For the larger version, approx. yardage is as follows: 240 yds (A), 175 yds (B), 100 yds (C), 100 yds (D). I am still working on this design and will provide a link here to the remaining rounds once I have completed them. All yardage amounts are estimates only.
This project has only been tested in size 5 cotton thread. Please feel free to try it with any thread/yarn you like, but I’m unsure of how different weights/fibers will react and can’t guarantee anything. Using a different material will mean different yardages will be required. Update: I have attempted this pattern with Red Heart Super Saver and can’t even get past round 4 without making adjustments. It can be done, but adjustments in count may definitely be required.
Due to popularity, I am making this project available as soon as I can, but it means that I will have to make it available in parts. I am still working on this design so it’s not even finished yet. Here is what I have so far, which shows that there is more to it than the instructions that follow. Part 2 is available HERE.
Curious about what to do with crochet mandalas? I turned this one into a beret and you can find the free crochet pattern HERE.

Gauge
After round 4, approx. 2.25″ across
Special Stitches
Beginning Linked Treble Crochet (bltr): Sk first ch, [insert hook in next ch, yo, pull lp through] 3 times, [yo, pull through 2 lps on hook] 3 times.
Linked Treble Crochet (ltr): [Insert hook in horizontal bar on side of prev st, yo, pull lp through] 2 times, insert hook in next ch, yo, pull lp through, [yo, pull through 2 lps on hook] 3 times.
Instructions
Round 1: With A, ch 4, join with sl st to first ch to form a ring, ch 1, 8 sc in ring, sl st to first sc. (stitch count: 8 sc)
Round 2: Ch 1, 2 sc in each sc around, sl st to first sc. (stitch count: 16 sc)
Round 3: Ch 1, [sc in sc, 2 sc in next sc] around. (stitch count: 24 sc) Fasten off A.
Round 4: With B, working in back loops only for this round, join with sl st in any sc, ch 3 (counts as dc here and throughout), dc in same sc as joining, 2 dc in each remaining sc, sl st to top of beg ch-3. (stitch count: 48 dc) Fasten off B.
Round 5: With C, join with sl st in any dc, *ch 12, bltr, ltr in each remaining ch, sk 3 dc from round 4, sl st to next dc with D (9 ltr-petal made), drop C, now with D, rep from *, changing to C on sl st, continue repeating from * until 12 petals are created, alternating colors, ending with sl st in first sl st. Use care when changing colors so the strand in the back of the unused color does not cause “cupping” of the project. If you prefer not to have this little strand on the back, you can cut off each petal to change colors. Or, alternatively, work this round in only one color. (stitch count: 12 9-ltr petals created) Fasten off C and D.
Round 6: With A, join with sl st to bottom of any petal on foundation row side (where you did your initial ch 12), ch 1, *9 sc along side of petal, [2 sc in unused loop of chain at top of petal] 2 times, 9 sc along opposite side of petal, ch 3, sl st in unused corresponding front loop of sc of round 3, ch 3, rep from * around each of 12 petals, sl st to first sc.
Round 7: Sl st to 5th sc at side of petal, ch 1, *sc in next 6 sc, ch 1, sc in next 6 sc, sk 10 sc, rep from * until all petals completed, sl st to first sc.
Round 8: Ch 1, *sc in next 5 sc, 3 sc in ch-1 sp, sc in next 5 sc, sk 2 sc, rep from * until all petals completed, sl st to first sc.
Round 9: Sl st to next sc, ch 1, *sc in next 4 sc, 3 sc in next sc, sc in next 4 sc, ch 3, sk 4 sc, rep from * until all petals completed, sl st to first sc. Fasten off A.
Round 10: Join B with sl st in any ch-3 sp, ch 4 (counts as tr here and throughout), 14 tr in same ch 3 sp, *sc in 2nd sc of 3-sc group at top of petal, 15 tr in next ch-3 sp, rep from *, ending with sc in last petal, sl st to top of beginning ch-4. Fasten off B.
Round 11: Join A with sl st in any sc, ch 4, 8 tr in same sc, *sk 4 tr, sc in next 7 tr, sk 4 tr, 9 tr in sc at top of next petal, rep from *, ending with 9 tr group at top of last petal, sl st to top of beginning ch-4.
Round 12: Ch 2 (counts as hdc here and throughout), sk same st as joining, sc in next 7 tr, hdc in next tr and in next sc, sc in next 5 sc, hdc in next sc, *hdc in next tr, sc in next 7 sc, hdc in next tr and in next sc, sc in next 5 sc, hdc in next sc, rep from * around, sl st to top of beginning ch-2. Fasten off A.
Round 13: Working in back loops only for this round, join D with sl st in top of same beginning ch-2 of round 12, ch 4, sk joining st, tr in each st around, sl st to top of beginning ch-4. (stitch count: 192 tr) Fasten off D.
Round 14: Join A with sl st in top of same beginning ch-4 of round 13, ch 1, sc in same joining st, sc in next 2 tr, *tr in corresponding unworked front loop of sc from round below (in this round, you’re looking at round 12), sk tr behind tr just worked, sc in next 3 tr, rep from * to last st, tr in corresponding unworked front loop of sc from round below, sk tr behind tr just worked, sl st to first sc.
Round 15: Ch 1, sc in each st around, sl st to first sc. (stitch count: 192 sc) Fasten off A.
Round 16: Working in back loops only for this round, join C with sl st in top of same sc as joining, ch 4, sk joining st, tr in each st around, sl st to top of beginning ch-4. (stitch count: 192 tr) Fasten off C.
Rounds 17-18: With A, rep rounds 14-15. Fasten off A.
Note: In preparation for the next round, which is very full, there is a bit of “cupping” on the last few rounds. If you are stopping your project with this smaller version, you may want to omit rounds there at the end.
Finishing
With needle, weave in loose ends carefully.