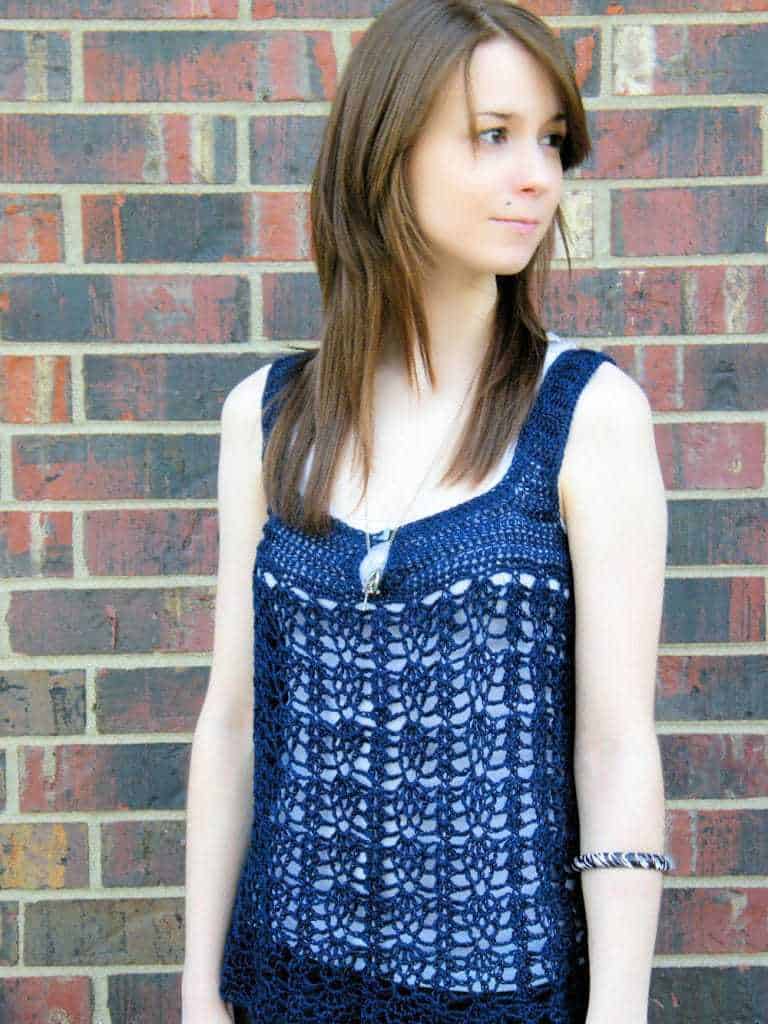
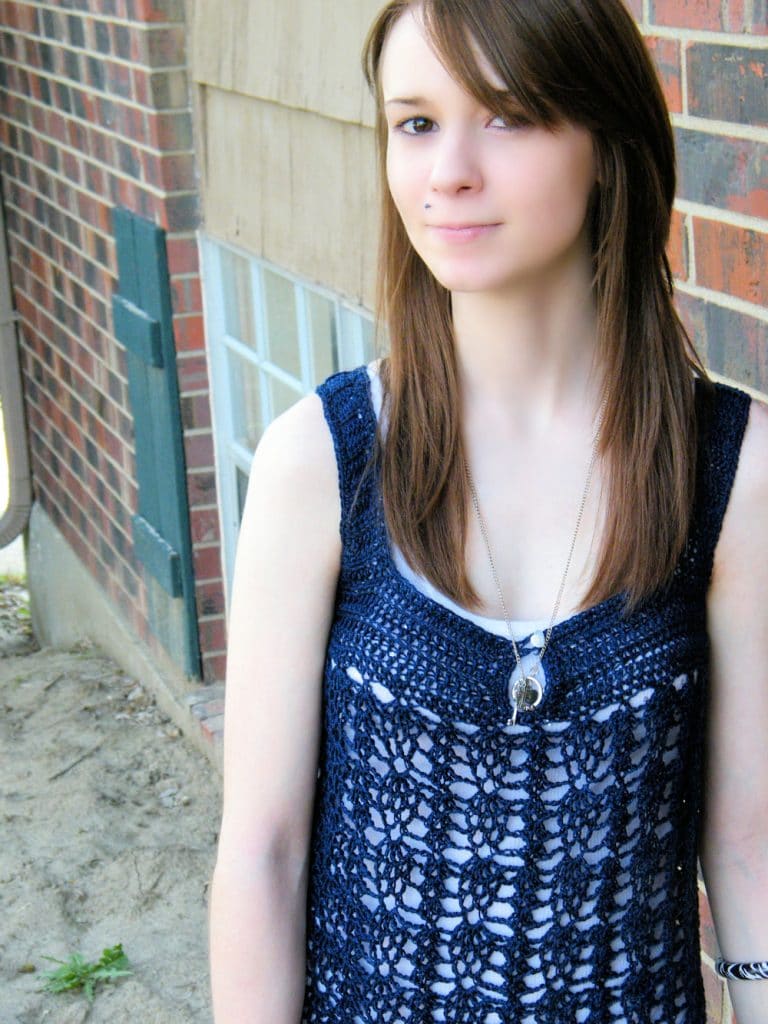
With its figure flattering styling, this babydoll pullover incorporates an easy stitch pattern to make a garment you’ll be able to wear throughout the year simply by layering over different pieces.

Clarice
designed by Kim Guzman © May 2009
Please read my Terms of Use
Technique: Regular Crochet
Finished Sizes
Small (Medium, Large, 1X, 2X, 3X). Model shown in size Small with -2” ease.
To Fit Bust Sizes
32” (36”, 40”, 44”, 48”, 52”) (Measure at the widest part of the bust. Do not use bra size.)
Materials
- 5/2 Mercerized Perle Cotton: 850 (925, 1000, 1075, 1150, 1225) yards
- Suggested hook sizes: G-6 [4.25mm] (smaller hook) and H-8 [5mm] (larger hook) (or sizes to obtain gauge)
- Yarn needle (for weaving ends)
- 3/8” round shank button
Unblocked Gauge
With larger hook, 17 hdc (back loops only; see pattern) for 13 rows = 4”
Special Stitches
Foundation Half Double Crochet (fhdc): Yo, insert hook in lower vertical side bars of prior st, yo, pull through 1 lp on hook, yo, pull through 3 lps on hook
Shell (Sh): [2 dc, ch 1, 2 dc] in indicated space
Additional Abbreviations
beg=begin(ning), ch=chain, dc=double crochet, hdc=half double crochet, lp(s)=loop(s), RS=right side, rem=remaining, rep=repeat, rnd(s)=round(s), sc=single crochet, sk=skip, sl=slip, sp=space, st(s)=stitch(es), WS=wrong side, yo=yarn over
Notes
Garment is worked from shoulder to hem, without seams.
Back of garment is worked from top down. Shoulders are joined at the top and worked down, joining under the armholes. Garment skirting is worked down to hem.
This pattern is available in six sizes only.

Instructions
Back
Row 1 (RS): With larger hook, ch 51 (57, 61, 63, 67, 67), hdc in third ch from hook and in each rem ch, turn.
Row 2: Ch 2 (counts as first hdc here and throughout), sk first hdc, working in back lps only, hdc in each rem hdc across, turn: 50 (56, 60, 62, 66, 66).
Rep row 2 until 15 (15, 15, 13, 13, 11) rows worked from beg.
Next row: Ch 2, working in back lps only, hdc in first hdc, hdc across to last hdc, 2 hdc in last hdc, turn: 52 (58, 62, 64, 68, 68) hdc.
Rep previous row until 17 (17, 19, 19, 21, 21) rows worked from beg. On final row, 54 (60, 68, 74, 82, 86) hdc. Fasten off.
First Front
Row 1 (RS): With WS of Back facing, join yarn, with larger hook, with sl st to begin working along unworked lps of row 1 of Back, ch 2, sk joining ch, hdc in each of next 5 (7, 8, 8, 9, 9) unworked lps, turn: 6 (8, 9, 9, 10, 10) hdc.
Don’t over-think this. Don’t try to imagine what you’re supposed to see. Just flip it over and do what the pattern says at the bottom the Back piece that you’ve created. Too many people are trying to imagine something that isn’t here. Just flip it over to the bottom and go. The pattern isn’t incorrect and it isn’t unclear. Just do what it says and you’ll be fine.
Row 2: Ch 2, sk first hdc, working in back lps only, hdc in each rem hdc across, turn: 6 (8, 9, 9, 10, 10) hdc.
Rep row 2 until 16 (18, 18, 20, 20, 22) rows worked from beg of First Front.
Next row: Ch 2, sk first hdc, working in back lps only, hdc across to within last hdc, fhdc (see Special Stitches) in last hdc, 15 (17, 18, 19, 20, 20) fhdc, hdc in last fhdc, turn: 22 (26, 28, 29, 31, 31) sts.
Next row: Ch 2, sk first hdc, working in back lps only, hdc across to last hdc, 2 hdc in last hdc, turn: 23 (27, 29, 30, 32, 32) hdc. Fasten off.
Second Front
Row 1: With WS of Back facing, working along unworked lps of row 1 of Back, count across 5 (7, 8, 8, 9, 9) sts from opposite side of row 1, join yarn in next unworked lp of ch, with larger hook, with sl st, ch 2, sk joining ch, hdc in each of next 5 (7, 8, 8, 9, 9) unworked lps, turn: 6 (8, 9, 9, 10, 10) hdc.
Row 2: Ch 2, sk first hdc, working in back lps only, hdc in each rem hdc across, turn: 6 (8, 9, 9, 10, 10) hdc.
Rep row 2 until 16 (18, 18, 20, 20, 22) rows worked from beg of Second Front.
Next row: Ch 17 (19, 20, 21, 22, 22), hdc in third ch from hook and in each rem ch, working in back lps only, hdc across, turn: 22 (26, 28, 29, 31, 31) sts.
Next row: Ch 2, working in back lps only, hdc in first hdc, hdc in each rem hdc across, turn: 23 (27, 29, 30, 32, 32) hdc. Do not fasten off.
Joining
Next row: With larger hook, ch 2, sk first hdc, working in back lps only, hdc across to last hdc, 2 hdc in last hdc, ch 6 (7, 9, 13, 15, 21),, without twisting, 2 hdc in first hdc of last row of Back, hdc across to last hdc of Back, 2 hdc in last hdc, ch 6 (7, 9, 13, 15, 21), without twisting, 2 hdc in first hdc of last row of First Front, hdc in each rem hdc, turn.
Next row: Ch 2, sk first hdc, working in back lps only, hdc in each hdc and in each ch across, turn: 116 (132, 148, 164, 180, 196) hdc.
Next row: Ch 2, sk first hdc, working in back lps only, hdc across, turn. Do not fasten off.
Neckline Trim
Row 1: With smaller hook, ch 1, sc evenly across edges of last 5 rows with 2 sc in corner, sc evenly around entire neckline, 2 sc in opposite corner of inner edge, sc evenly across edges of 5 rows, turn.
Row 2: Ch 1, sc in each sc around, except make 2 sc at left front corner and [sc, ch 5, sc] at right front corner. Do not fasten off. Beg working in rnds. Do not turn.

Skirting
Rnd 1: With larger hook, ch 1, sc in each side edge of prior 2 rows and in each hdc around lower edge, sl st in first sc: 120 (136, 152, 168, 184, 200) sc.
Rnd 2: Ch 1, sc in each sc around, sl st in first sc.
Note that I’ve changed to the smaller hook in the next round. There is a reason for this. Your project will ruffle out, if you don’t.
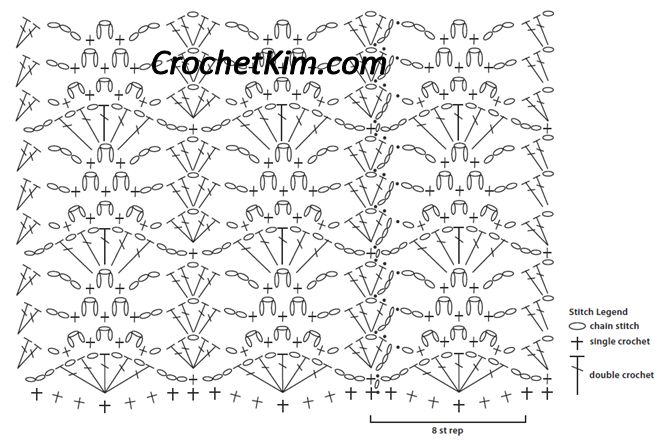
Rnd 3: With smaller hook, ch 1, sc in same sc as joining, * ch 3, sk 3 sc, [(dc, ch 1) 4 times, dc] in next sc, ch 3, sk 3 sc, sc in next sc, rep from * to within last 3 sc, ch 3, sk 3 sc, sl st in first sc.
Rnd 4: Ch 3, [dc, ch 1, 2 dc] in same sc, * ch 1, [sc in next ch-1 sp, ch 3] 3 times, sc in next ch-1 sp, ch 1, Sh (see Special Stitches) in next sc, rep from *, ending with sl st in top of beg ch-3, sl st in next dc and in next ch-1 sp.
Rnd 5: Ch 3, [dc, ch 1, 2 dc] in same ch-1 sp, * ch 2, [sc in next ch-3 sp, ch 3]2 times, sc in next ch-3 sp, ch 2, Sh in ch-1 sp of next Sh, rep from *, ending with sl st in top of beg ch-3, sl st in next dc and in next ch-1 sp.
Rnd 6: Ch 3, [dc, ch 1, 2 dc] in same ch-1 sp, * ch 3, sc in next ch-3 sp, ch 3, sc in next ch-3 sp, ch 3, Sh in ch-1 sp of next Sh, rep from *, ending with sl st in top of beg ch-3, sl st in next dc and in next ch-1 sp.
Rnd 7: Ch 1, sc in same ch-1 sp, * ch 3, sk ch-3 sp, [(dc, ch 1) 4 times, dc] in next ch-3 sp, ch 3, sc in ch-1 sp of next Sh, rep from *, ending with sl st in first sc.
Rep rnds 4-7, until garment measures approximately 21 (22, 23, 24, 25, 25)” from shoulder to hem, or to desired length, ending with a rnd 7 of stitch pattern. Fasten off.
Note: Garment will lengthen a minimum of 3” when worn or blocked. For best results, allow to hang overnight before fastening off at hem.

Armhole Trim
With smaller hook, join yarn with sl st at bottom of armhole, ch 1, sc evenly around, sl st in first sc. Fasten off. Rep for opposite armhole.
Finishing
Block as desired. Attach button adjacent to button hole loop. Weave in ends securely.
Clarice Crochet Along Q & A
Here are some common questions about this pattern.
1. 5/2 cotton? Light fingering weight? What number and I looking for on the package?
If you want to know the specific cotton thread I used, look in the materials section of the pattern and click the link. The thread I used is available in cones at a great price, in a lot of different colors. It is size 5 cotton which is in between size 10 (bedspread cotton) and size 3. Ravelry only has a “thread” designation for cotton thread without regard to its size. For an approximate size in other yarns, you’re looking at about a light fingering.
Some people have been successful in getting gauge using two strands of size 10 held together. Sometimes it works. Sometimes it doesn’t. I don’t know why. It may be because of the way the person tensions their yarn. I just don’t know. Give it a try, if you have access to size 10.
If you want to use a heavier weight yarn, you’re going to have to make adjustments unless you’re looking for a stiff garment. You can’t just use a small hook with worsted weight to get the same gauge and expect it to work for you unless you want battle armor. You may be able to make something from a smaller instruction in order to get the size you need. This isn’t an exact science. You’re going to have to experiment. What’s the worst that can happen? It’s got to be safer than pressure canning. 😉
2. Could you explain what “-2 ease” means?
It means that the actual measurement of the garment was two inches less than the circumference of my daughter who modeled it.
3. The pattern indicates there is a -2″ ease on the small version pictured. Is the ease -2″ in all the sizes?
Let’s say you have a sweater. That sweater measures 38″. That number doesn’t change. It’s always 38″. If I put it on my daughter, it will be modeled at 2″ positive ease. If I put on me, it will be modeled at 8″ negative ease (very tight). Ease is ONLY the difference in measurement between the body and the garment. I stated it ONLY because I want people to have an idea of how the garment will look. Most publishers don’t give you that information and you end up never knowing about it. For instance, you could have a medium model wearing a size small. It looks fabulous on the size medium model so you go ahead and make your size, never knowing that you should be making the smaller size in order to have the same look. I’m giving you full disclosure; something to which you are entirely unaccustomed in crochet patterns. I realize that, by giving too much information, it usually causes over-thinking.
4. In the pattern instructions for the Back it says to continue row 2 for (15, 15, 13, 13, 11) rows Do I really crochet 15 rows for a small and only 11 rows for the 3X?
Read the rest of the instructions. You will find that the size 3X probably has more rows than the other sizes IN TOTAL. You just have to understand that you need more shaping rows for larger sizes so, as the sizes go up, the number of shaping rows increase whereas the straight rows decrease.
5. Does the back look like the front without the separation and button closure?
If you need to see a photo of the back, there is a photo on Ravelry. The armhole shaping is about the same, but the back doesn’t have a big “scoop” for the neck. It covers the entire upper back.
6. About gauge.
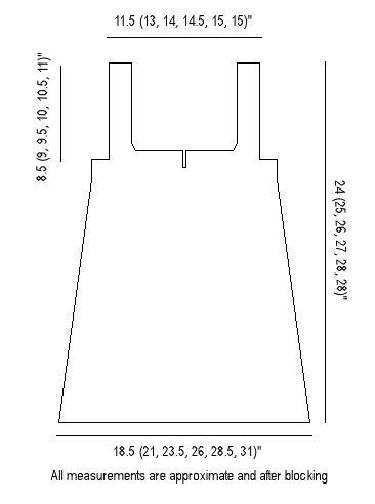
The bodice is the most important part of this garment. It is also the smallest and takes the least amount of time. Get it right before you continue!
Take all the time you need to get the bodice exactly the way you want it before you continue. The bodice area is the most crucial (and smallest) part of this garment. Once you have the bodice, you’re home free.
It’s important to remember that science is involved. The top is designed in cotton which can be slightly heavier than some other fibers. When you pull down on it to mimic gravity, the width will reduce. You are trying to meet the size in the schematic, but you have to stretch it a bit from top to bottom when making that measurement because that is what happens when you put on the extra weight of the rest of the top. I like to place it on a flat surface and smooth it out in the direction of gravity before taking a measurement.
Swatch if you want. You want to at least get a ball park idea of what hook you’re going to use for the bodice and I do love swatches for testing out water on my garment so I know what is going to happen to it when I wash it later. If you like to live on the wild side, don’t do that extra step UNLESS you’re using alpaca. If you decide to use alpaca without wetting it down, you do so at your own risk. I’ve warned you! Ha!
You need to understand that a good swatch should be about an 8″ square so that you can block it and take a measurement of the 4″ on the inside. I don’t even bother. When I think I’ve got a good guess on the hook, I just jump right in and start making the bodice and use the finished schematic to see if I’m on track. When I’ve got a piece of the garment that’s not all that much different in size than a swatch should be, I just go right for the garment. If I have to take it out, I do. It’s small enough that it’s not a big deal.