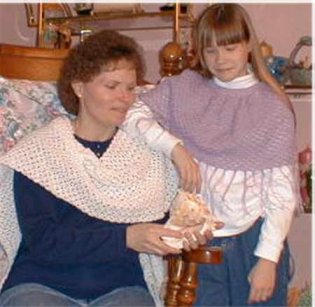
Ladies Spring Shawl and Girl’s Spring Poncho
designed by Kim Guzman © May 2001
Please read my Terms of Use
Technique: Regular Crochet
Special Stitches Puff Stitch (Puff St): In the same sp, (YO, insert hook in sp, YO and pull a lp through) 3 times. YO and pull through all 7 lps on hook. Ch 1 to complete Puff St.
Girl’s Spring Poncho
Sizes
Small (4/5), Medium (6/8), Large (10/12) All sizes are written for the smallest size indicated above, with size changes written in parenthesis. If there is only one number, then it will be the same for all sizes. It is recommended that you circle all calculations for the size you are making before starting the project.
Materials
- 5 (5, 6) balls J&P Coats® Luster Sheen (50 gm/150 yd per ball) – Lilac
- Crochet Hook Sizes E and F (or sizes to obtain gauge)
- Yarn Needle
- 4 x 6″ piece of cardboard
- Ruler or Measuring Tape
- Plastic Stitch Markers (optional)
Gauge
When completed, neck ribbing should measure 14 (15, 16)”. Worked in Stitch Pattern with larger hook, 6 rows measures 2″.
If you are having trouble closing the 7 lps of the Puff St, when pulling up the lps, try to work loosely and pull up the lps even with your work.
Neck Ribbing With smaller hook, and leaving an 8″ tail for sewing, ch 9. Work sc in second ch from hook and in each ch across. Ch 1, turn. * Work sc in BACK LOOP only in each of next 7 sc. Work sc in last sc in BOTH LOOPS. Ch 1, turn. Rep from * until a total of 91 (97, 103) rows have been completed from beg. Remove hook and pull the lp up (or place a Stitch Marker in the loop so that it will not come unraveled. Thread the beg “tail” of yarn into yarn needle and whip stitch the top loops of the last row worked to the unworked lps of the ch in the first row. (Do not twist the neck ribbing.)
Switch to larger hook and begin working in rounds along sides of rows.
Rnd 1: Sc in the side of the first row. * Ch 3, sc in the side of next row. Rep from * around. Ch 3, sl st to the first sc of this round. 91 (97, 103) ch-3 lps.
Rnd 2: Sl st into first ch-3 sp. * Ch 3. Puff St in next ch-3 sp. (Dc, ch 2, dc) in next ch-3 sp. Rep from * to within last ch-3 sp. Puff St in last ch-3 sp. Sl st to top of beg ch-3.
Rnd 3: Ch 3. * (Dc, ch 2, dc) in top of next Puff St. Puff St in next ch-2 sp. Rep from * to within last Puff St. (Dc, ch 2, dc) in top of last Puff St. Sl st to top of beg ch-3.
Rnd 4: Ch 3. * Puff St in next ch-2 sp. (Dc, ch 2, dc) in top of next Puff St. Rep from * to within last ch-2 sp. Puff St in last ch-2 sp. Sl st to top of beg ch-3.
Rep Rnds 3-4 until piece measures 9 (10, 11)” from beg, ending with a Rnd 3.
Final Rnd: Ch 1. * Work (sc, ch 2, sc) in next ch-2 sp. Sk dc. Work sc in the sp before Puff St. Sk Puff St. Work sc in the sp before the next dc. Rep from * around. Sl st to the first sc. Fasten off. Weave in all ends.
Fringe Using the cardboard piece, cut 12″ pieces of Luster Sheen and with TWO 12″ pieces of Luster Sheen, work fringe in each ch-2 sp of Final Rnd. Trim fringe to even the lengths.
Tip I like to use a plastic videotape cover to make my fringe. Wrap Luster Sheen around the width of the cover and the edge makes a nice recess for placement of your scissor.
Spring Shawl
Sizes
One size fits most.
Materials
- 9 balls J&P Coats® Luster Sheen (50 gm/150 yd per ball) – White
- Crochet Hook Size F (or size to obtain gauge)
- Yarn Needle
- 4 x 6″ piece of cardboard
- Ruler or Measuring Tape
Finished Size
13″ × 60″ not including fringe
Gauge
A swatch worked in Stitch pattern starting with 46 chs and worked for 18 rows equals a 6″ square.
Ch 94.
Row 1: Puff St in fourth ch from hook. * Sk 2 ch, (dc, ch 2, dc) in next ch, Puff St in next ch. Rep from * to within last four sts. (Dc, ch 2, dc) in next ch. Sk 2 ch. Dc in last ch. Ch 3, turn.
Row 2: * Puff St in next ch-2 sp. (Dc, ch 2, dc) in top of next Puff St. Rep from * to within last Puff St. (Dc, ch 2, dc) in last Puff St. Dc in sp between last Puff St and ch-3 turning ch. Ch 3, turn.
Rep Row 2 until piece measures 60″ from beg. Do not ch-3 at the end of the final row. Fasten off. Weave in all ends carefully.
Fringe Using the cardboard piece, cut 12″ pieces of Luster Sheen and work fringe with TWO 12″ pieces of Luster Sheen between each (dc, ch 2, dc) on both the first and final rows. Trim fringe to even the lengths.