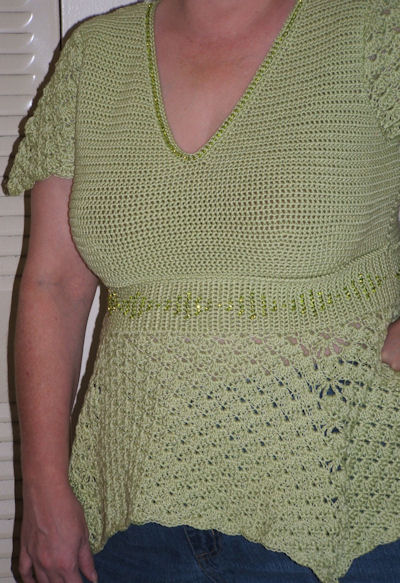
Sonrisa Empire Waist Top
by Kim Guzman © Mar. 2016 (republished)
Please read my Terms of Use
Technique: Regular Crochet
Alterations
These instructions are rather lengthy. But, my goal is that you be able to produce a garment that you will be proud to wear. I want all your friends (and maybe some strangers) to walk up to you and ask you where you bought it.
The pattern itself isn’t nearly as lengthy as the Alterations section, but includes items that you won’t find in traditionally-published venues. In traditional publishing, there is far less room to really give you the information needed to produce this kind of garment. That is the reason I love the internet so much! I can give you the information you need to produce a high quality garment since there is no limitation on space.
Please read through all the Alterations section before proceeding with the pattern instructions. It is very important that you be aware of certain features and where you may or may not need alterations. Proper planning ahead of time will help you complete the pattern much more easily.
Always remember! The numbers given in the pattern are suggestions. They are not gospel, written in stone. You are the best judge of what fits YOU.
Fit
For this garment, the bodice is made first. If possible, once the bodice is complete, try it on to ensure a proper fit. You shouldn’t expect to always be able to stitch this type of garment and always be happy with the result. A difference in yarn or a difference in your gauge may produce different results. Differences in bodies will also affect the finished product. The bodice is the most important part of this garment and you should customize it the way you want it. If you have to take out and rework the armholes to add extra length or remove length, do not worry! This part of the garment is pretty short. And, you really want to get this part right and love the fit. For best results, I crocheted together the seams when I tried it on. (And, no, it wasn’t perfect the first time and I had to adjust the armhole shaping too.) But, if you temporarily crochet the seams together instead of seaming with a needle, it saves time when trying to take it out. And, truthfully, I cheated. My bodice still has crocheted seams on the sides, although I seamed with a needle on the shoulders. I left the crocheted seam because the bodice is tight. I didn’t want there to be any pulling of the seam. A crocheted seam is a better choice for that area.
The bodice of this garment is a tight fit. This means there is no ease. It fits right against your body. You may not be accustomed to patterns like this and will need to ensure that you measure yourself, or, ideally, have someone else measure you.
First, don’t guess at your underbust measurement. While wearing only your bra, measure yourself under the bust, where the waistband will sit. This should be your bra size. Now, measure yourself around the widest part of your bust. This is your bra cup size. The difference between the two indicates your cup size for this garment. It may not be the same as your actual cup size because a bra will add additional width. But, since I’m assuming you’ll be wearing your bra under your garment, that is the size you want.
If the difference between those two numbers is 1, your cup size is A. If the difference between those two numbers is 2, your cup size is B. A difference of 3 is C and a difference of 4 is D, and so on.
Next, measure yourself from the top outside portion of your shoulder to the top outside portion of your shoulder on the opposite side, across your back. Look at the upper back portion of the schematic for the back. This garment is intended to fit across the back, about 1.5-2” from your shoulder. If you discover that the back width in the schematic is much too small for you because you have a larger frame, you’ll want to make accommodations in the pattern for the larger frame.
By example, my measurement across, top outer shoulder to top outer shoulder, is 17.5”. The upper back of my finished garment is 14”. The garment is not intended to go all the way across the upper back. Mine actually sits into the shoulder by about 1.75” on each side on me.
If you want to make alterations to this portion of the pattern, it is very easy. Add or subtract stitches during the armhole decreasing. For, instance, if you would like your garment to fit about 15” instead of 14”, you’ll want to add about 4 stitches. When doing the armhole decreasing, omit 2 rows of armhole decreasing. You’ll still want those rows. You’ll just not do the decreasing. Since my pattern allows you to fill in the numbers you want, you’ll be able to easily fill in those areas with what you want instead of using only the suggested numbers on the right side.
And, yes! By all means, fill in those blanks! If you want to make the same size later, you’ll have that handy. If you want to make a different size, you can just print another.
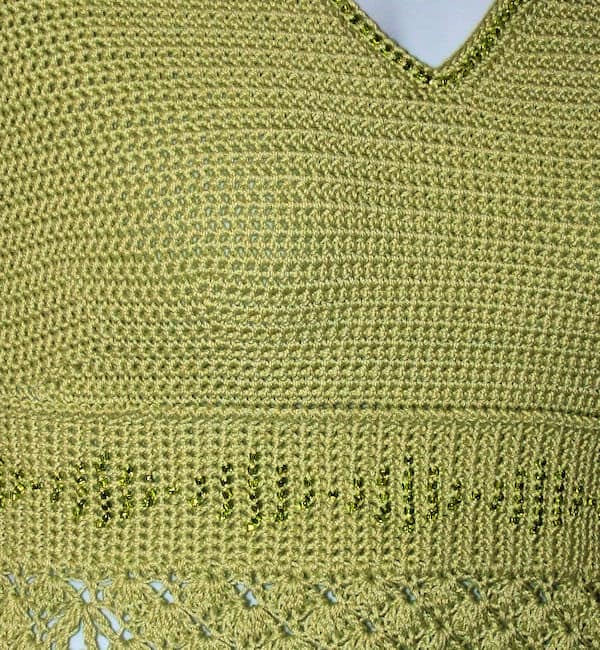
Beadwork
The beadwork isn’t absolutely necessary. If you prefer not to include beads, you certainly don’t have to. It is your choice.
Short Row Shaping
Short row shaping is optional and is completely a personal choice.
Please note the waistband and where it sits, directly under the bust. If you have a cup size of A-B, you’ll not need to worry about this short row shaping. However, if you have a C cup or over, you’ll want to think about the short row shaping.
The purpose of short row shaping is to add a bit of extra fabric above the waistband only in the front so that you don’t have to continually pull down the top in order to keep the waistband in position. Due to the nature of this garment, you could pull it down, but this will result in the v-neck line coming down as well. This may, or may not be what you want. So, if you have a C cup or over, please consider adding a few extra rows of short row shaping.
How much short row shaping is also up to the individual. So, I’m not including it in the pattern. I am only going to explain, step-by-step, what I did and offer suggestions.
After completing the row of straight single crochet, after the reverse single crochet row, pull up a little on the last loop so that it won’t fall out. There is no need to cut the yarn. Take another ball of yarn to do your short row shaping. Turn your work.
Look at your pattern for the Back of your size. Determine the amount of single crochets you have after you have completed the armhole shaping. In my case, I had 64 single crochets remaining. I deducted 2 from this number and this is the number of single crochet I started with on my first short row shaping row: 62. My first row will be across the center 62 single crochets. Since my Back started with 88, this means that there are 13 single crochet on each side. So, I counted over 13 single crochet and joined my yarn with a slip stitch.
Now, chain 1, work a decrease single crochet, 58 regular single crochet, and another decrease single crochet. This ends with 60 single crochet. (Remember that these numbers are reflective of only the size I made. Your numbers may be slightly different based on the number determined in the paragraph above.)
Turn, chain 1, work a decrease single crochet, 56 regular single crochet, and another decrease single crochet. This ends with 58 single crochet. This concludes the second row of short row shaping.
I then completed two more rows of short row shaping, decreasing the number of stitches each time. This is a total of 4 rows. This should be sufficient for C-D cups. DD-E cups will need about 6 or 8 total rows. Always remember to add short row shaping in increments of 2 only!
Once you have your short row shaping, cut off that yarn and return your hook to the beginning of the row where you left off.
You’ll complete this row as normal, except you’ll work into the sides of the rows of short row shaping. Be sure to work into only one loop of the sides of the rows. This produces the best result. Before continuing, be sure to inspect your work carefully. The joining at the sides of the short rows will be noticeable, just like any other dart in fabric. But, you’ll want to be sure that you are happy with the positioning of your single crochet in this area. Get it how you want it now, instead of waiting until the entire bodice is finished! And, make sure you have the correct stitch count as well.
Once you have completed that row, it counts as the second row after the reverse single crochet row. You’ll need to remember NOT to count the short rows as actual rows of the garment. Always count from the sides of the bodice. Just ignore the short rows when counting.
Bust Shaping
The pattern, as stated, assumes a bust of about a C-D cup, meaning that the waistband is about a 3-4” difference from the actual chest measurement. If you are a C-D cup, follow the instructions (with the optional, suggested short rows). However, if you have a different cup size, you’ll want to think about alterations here.
The pattern has 3 rows of bust shaping, each increasing by about 1” with 4 extra stitches on each row, for a total of 12 extra stitches.
If you have a smaller bust, you may only want one or two rows of bust shaping. Just remember that, by decreasing the number of stitches at the bust, you are also decreasing the number of stitches throughout. You’ll want to add those stitches back into the garment by not decreasing the full number once you get to the armhole decreasing.
The same holds true for a larger bust. If you add another row of bust shaping to accommodate a larger bust, you’ll want to decrease those stitches in the armhole decreasing.
Armhole Height
You will notice that the armhole height decreases as the size goes up. No, this is not a mistake. No, it’s not something you’ve probably seen before. But, remember that most patterns you have seen create a project with armholes too long. The amount of armhole height in this pattern is adjusted depending on how much width is given in the bottom of the armhole. So, any height is absorbed by that figure. Note that the armhole circumference does indeed increase. It just doesn’t shown as an increase in height. It shows in an increase in width instead.
Garment Length
Be sure to measure your body from shoulder to where the waistband will sit. If you have a long waist, you may want to add a few rows to both the back and front. Just remember to add these in even numbers only, add to both the front and back and that you take these extra rows into account when determining a total number of rows.
For the skirting, you can easily continue adding as many rows as you like to obtain the length you want. Remember, though, that you’ll need more yarn for any alterations like this.
Shoulder Slope
This is something you will rarely find in crochet patterns but is always included in ready-to wear garments. What it means is that the top of the shoulder is actually a diagonal line rather than a straight line. The shoulder is meant to be higher at the neckline for a better fit.
For instance, if your shoulder is actually 14 stitches across, the last 3 rows may be 9 stitches, then 8 stitches then 7 stitches. This creates a slope. When stitching the shoulder, you are still going to stitch together the entire shoulder, or rather the entire 14 stitches across.
If you do not understand this, please take one of your ready-to-wear tops or t-shirts. Lie it out flat. You should be able to see that the neck side of the shoulder is actually higher than the armhole side.
If, however, this concept of clothing design isn’t for you, simply work across all 6 rows of shoulder shaping across the 14 stitches (or the number of stitches you have). This shoulder slope just provides a better fit. I suggest it, but again, not written in stone here.
This sort of thing is always omitted in traditional crochet patterns due to space.
Yarn
I have chosen J&P Coats Royale Fashion 3 Crochet Thread for this project because it most closely resembles the crochet thread used in most of the ready-to-wear fashions I have seen. Since I’ve seen so many people in online groups trying to reproduce the crochet fashions they see available in ready-to-wear, I wanted to “jump the gun” and provide something of equal quality.
To give you an idea of the yarn’s size, it is approximately the size of two strands of size 10 cotton, held together.
Bead Single Crochet
I have found this to be the best way to produce the results I want when working with beads and single crochet. It places the bead in the front of your single crochet and you have the opportunity to adjust it as you see fit. Since this is your project, however, you can do any method in which you are familiar in order to put the beads on your work.
For this method, you’ll need to pre-string your beads. For best results, due to the beads being so small, I like to use candle wax in order to make my yarn into a “needle”. Light your candle and allow the wax to pool up a bit. Blow out the candle and quickly insert about one inch of the end of your yarn into the melted wax. Immediately start forming into a point as the wax cools. Once it is fully cooled, pre-string your beads using your new “bead needle.”
Always check your ball of yarn for ties in the yarn before stringing the beads. Make sure you have sufficient yarn without cuts. Trust me when I say that it is extremely frustrating to discover a cut in the yarn when you have about a third of your waistband finished and realize that you have to cut and re-string about 100 beads.
Sleeves
Like the Bodice, the sleeves of this garment are a tight fit. If you prefer a looser fit on the sleeves, please use a larger hook, maintaining the armhole measurements given. Or, rather than having points A and B joined at the side seam, position them further apart.
This sleeve composition is a bit different than what you normally see. Again, I’m given unlimited space when writing patterns I sell online. So, this gives me the freedom to provide you with something non-traditional, which produces more of a ready-to-wear style. I can’t do this with traditionally-published patterns. But, it means a little bit more instruction.
This sleeve is worked from the top, down. It has an almost triangular shape; very non-traditional. The important thing to remember is that the measurement along the side edge, across the top and along the opposite side edge, from point A to point B is the circumference of your armhole as shown in previous schematics. Points A and B will touch at the side seam. In the event you have made any alterations in the armhole, you will also need to make alterations to the sleeve. Just make sure that the measure around the top from A to B is the same measurement as the circumference.
Do not worry that the sleeve edge is a different shape than the armhole edge. Afghans require that the side edges match perfectly so that the pieces lie flat. Clothing is different. Sleeves aren’t meant to lie flat and will ease right into the armhole.