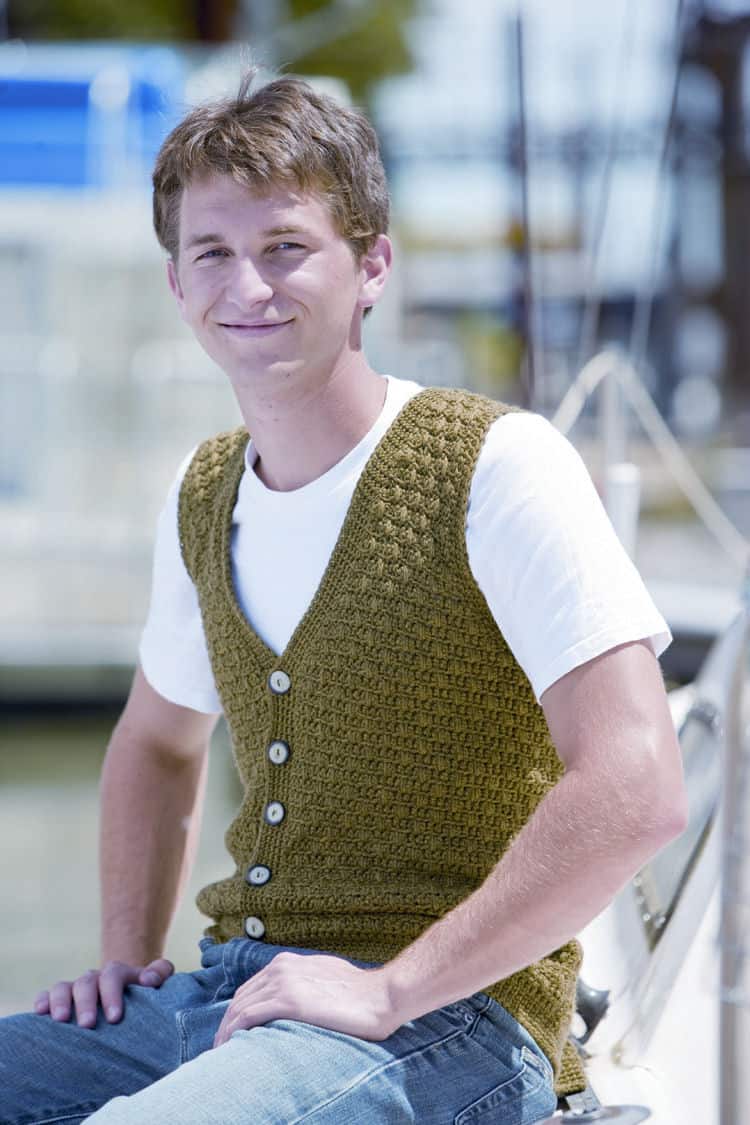
Kim Guzman, well-known for her stylish mens crochet fashions, has created this smart, casual vest for men.
This lightly-textured vest will be a perfectly matched with short sleeves in the Fall and Spring or long sleeves in the Winter months.
With its generous size range of mens Small through 3X (actual chest measurement of up to 36”, 40”, 44”, 48”, 52” and 56”), you will want to make one for all the men in your life. (And you may want to make one for yourself as well!)

Swish Mens Vest
designed by Kim Guzman © Sept. 2010 (original publish date)
Please read my Terms of Use
Technique: Regular Crochet
Finished Sizes
Mens Small through 3X. Choose a finished size of about 4” to 6” greater than actual chest measurement, but be sure to measure the belly as well.
Some bellies are greater than the chest measurement and the vest will fit around the chest but won’t button around the belly. (Model made in size Medium.)
To Fit Chest Sizes
Up to 36” (40”, 44”, 48”, 52”, 56”)
Materials
- Knit Picks Swish Worsted (110 yds/50g per ball): 9 (9, 10, 12, 12, 13) skeins (model made in color Lemongrass Heather)
- Size J/6mm crochet hook (or size needed to meet gauge) (designated larger hook)
- Size H/5mm crochet hook (designated smaller hook)
- 5 stitch markers (or small pieces of yarn)
- 5 size 3/4” round buttons
- Yarn needle (for weaving ends)
- Optional: Sewing needle and thread (for use in sewing buttons if the holes in the buttons are too small for the yarn)
Blocked Gauge
Swatch must be wet-blocked; in stitch pattern with larger hook, 14 sts and 14.5 rows measure 4” square.
Abbreviations
beg=begin(ning); ch=chain; cont=continue; dec=decreas(e)(ing); FLsc=front loop single crochet; g=grams; Lsc=long single crochet; mm=millimeters; pat=pattern; prev=previous; RS=right side; rem=remaining; rep=repeat; rnd=round; sc=single crochet; sk=skip; sl=slip; sp=space; SPI=Stitch Pattern I; SPII=Stitch Pattern II; st(s)=stitch(es); WS=wrong side; yds=yards
Pattern Notes
To decrease at the beginning of a row, skip the first stitch and work the stitch as indicated in the next stitch.
To decrease at the end of a row, work to the last 2 stitches, skip the next stitch and work the stitch as indicated in the last stitch.
When shaping armholes and neckline, it is necessary to maintain established stitch pattern which means to adjust Stitch Pattern as necessary to ensure that Long Single Crochet are stacked in the same manner as previously worked.
If working in only one loop on the last stitch of the row causes stretching at the edge, work the last stitch into both loops.
When the pattern indicates an “x” in the stitch count, that row is not worked for that size.
Designer Tip
Many women have told me that they would like to make this for themselves. Please remember that a woman’s shoulder-to-shoulder measurement is smaller than a man’s. You will need to decrease when doing the armhole shaping or the vest will stick out from your shoulder.
Special Stitches
Front Loop Single Crochet (FLsc): Work sc in the front loop only of the stitch, as it faces you.
Long Single Crochet (Lsc): Insert hook from front of work to the back in corresponding single crochet 2 rows below the working row, yarn over, draw up loop even with the working row (to prevent buckling of fabric), yarn over, draw through 2 loops on hook.
Stitch Patterns
See pattern Instructions (below) for chain count.
Stitch Pattern I (SPI):
Row 1: Ch 1, sc in 2nd ch from hook and in each rem ch, turn.
Rows 2-3: Ch 1, FLsc across, turn.
Row 4 (RS): Ch 1,*FLsc in each of next 3 sc, Lsc, rep from * to last 3 sc, FLsc in each of last 3 sc, turn.
Row 5: Ch 1, FLsc across, turn.
Row 6: Ch 1, FLsc in first sc, *Lsc, FLsc in each of next 3 sc, rep from * to last 2 sc, Lsc, FLsc in last sc, turn.
Row 7: Ch 1, FLsc across, turn.
Rep rows 4-7 for pat.
Stitch Pattern II (SPII):
Row 1: Ch 1, sc in 2nd ch from hook and in each rem ch, turn.
Rows 2-3: Ch 1, FLsc across, turn.
Row 4 (RS): Ch 1, *FLsc in each of next 3 sc, Lsc, rep from * to last sc, FLsc in last sc, turn.
Row 5: Ch 1, FLsc across, turn.
Row 6: Ch 1, FLsc in first sc, *Lsc, FLsc in each of next 3 sc, rep from *across, turn.
Row 7: Ch 1, FLsc across, turn.
Rep rows 4-7 for pat.
Crochet Pattern Instructions
Back
Row 1: With larger hook, ch 68 (74, 82, 88, 96, 102), sc in 2nd ch from hook and in each rem ch, turn—67 (73, 81, 87, 95, 101) sc.
Working in SPI (II, II, I, I, II), beg with row 2, work 50 (52, 58, 60, 64, 68) rows.
Armhole
Next row (WS): Sl st across 7 (7, 10, 10, 12, 12) sts, ch 1, maintaining established st pat here and throughout, work across, 53 (59, 61, 67, 71, 77) sc only, turn, leaving rem sc unworked.
Next row: Ch 1, dec at beg and end of row (see Pattern Notes), work across, turn—51 (57, 59, 65, 69, 75) sc.
Rep prev row 3 (4, 4, 6, 7, 9) times more—45 (49, 51, 53, 55, 57) sc.
Without dec, cont until 87 (91, 95, 99, 103, 109) rows completed from Hem.
Shoulder
Next row (RS): Ch 1, work across 6 (7, 8, 8, 9, 9) sc only, turn, leaving rem sc unworked.
Next row: Ch 1, work across, turn.
Row 3: Rep row 2. Fasten off.
Opposite Shoulder
Next row (RS): After row 87 (91, 95, 99, 103, 109), sk 33 (35, 35, 37, 37, 39) sc, join yarn with sl st in next sc, ch 1, work across rem 6 (7, 8, 8, 9, 9) sc, turn.
Rep as for first Shoulder.
First Front
Row 1: With larger hook, ch 32 (36, 40, 44, 46, 50), sc in 2nd ch from hook and in each rem ch, turn—31 (35, 39, 43, 45, 49) sc.
Working in SPI (I, I, I, II, II), beg with row 2, work 48 (50, 52, 56, 58, 62) rows.
Begin V-Neck Decreasing
Next row (WS): Ch 1, working dec at end of row (mark as neck edge) and maintaining st pat here and throughout, work across, turn—30 (34, 38, 42, 44, 48) sc.
Next row: Ch 1, work across, turn.
Rep prev 2 rows 0 (0, 2, 1, 2, 2) times more—30 (34, 36, 41, 42, 46) sc.
Simultaneous Armhole Shaping
Next row (WS): Sl st across 7 (7, 10, 10, 12, 12) sts, ch 1, working dec at neck edge, work across, turn—22 (26, 25, 30, 29, 33) sc.
Next row: Ch 1, working dec at armhole edge, work across, turn—21 (25, 24, 29, 28, 32) sc.
Next row: Ch 1, dec at beg and end of row, work across, turn—19 (23, 22, 27, 26, 30) sc.
Rep prev 2 rows 2 (2, 2, 3, 4, 5) times more—13 (17, 16, 18, 14, 15) sc.
Continue V-Neck Shaping
Work following row 0 (1, 0, 1, 1, 1) time: Ch 1, sc across, turn—x (17, x, 18, 14, 15) sc.
Work following row 0 (1, 0, 1, 1, 1) time: Ch 1, working dec at neck edge, work across, turn—x (16, x, 17, 13, 14) sc.
Rep prev 2 rows 0 (3, 0, 3, 0, 0) times—x (13, x, 14, x, x) sc.
Next 3 (3, 3, 3, 5, 5) rows: Ch 1, work across, turn—13 (13, 16, 14, 13, 14) sc.
Next row: Ch 1, working dec at neck edge, work across, turn—12 (12, 15, 13, 12, 13) sc.
Rep prev 4 (4, 4, 4, 6, 6) rows 6 (5, 7, 5, 3, 4) times—6 (7, 8, 8, 9, 9) sc.
Without dec, work 5 (3, 1, 1, 5, 1) rows more. Fasten off.
Second Front
Work 48 (50, 52, 56, 58, 62) rows as for First Front.
Begin V-Neck Decreasing
Next row (WS): Ch 1, working dec at beg of row (mark as neck edge) and maintaining st pat here and throughout, work across, turn—30 (34, 38, 42, 44, 48) sc.
Next row: Ch 1, work across, turn.
Rep prev 2 rows 0 (0, 2, 1, 2, 2) times more—30 (34, 36, 41, 42, 46) sc.
Simultaneous Armhole Shaping
Next row (WS): Ch 1, working dec at neck edge, work across 22 (26, 25, 30, 29, 33) sc, turn, leaving rem sc unworked, turn—22 (26, 25, 30, 29, 33) sc.
Cont as for First Front.
Seaming
With yarn needle and WS facing, seam shoulders and sides.
Trim
Rnd 1: With smaller hook and RS facing, join yarn at either shoulder seam with sl st, ch 1, sc evenly around neckline, fronts and bottom, with 2 sc at each corner, sl st to first sc.
Rnd 2: Ch 1, sc in each sc around, with 2 sc at each corner, sl st to first sc.
Rnd 3: With stitch markers or small pieces of yarn, mark 5 evenly-spaced button holes on Left Front (Right Front for women). Rep rnd 2, except at buttonhole positions, [ch 2, sk 3 sc].
Rnd 4: Rep rnd 2, except at buttonhole positions, work 3 sc in each ch-2 sp of buttonhole.
Rnd 5: Rep rnd 2. Fasten off.
Armhole Trim
Rnd 1: With smaller hook and RS facing, join yarn at bottom of armhole with sl st, ch 1, sc evenly around armhole, sl st to first sc.
Rnd 2: Ch 1, sc in each sc around, sl st to first sc.
Rnd 3: Rep rnd 2. Fasten off.
Blocking
Immerse garment completely in cool water. Gently squeeze out water. Roll in dry towel to remove excess water. Lie garment flat and shape as it will be worn. Allow to dry completely.
Finishing
Sew on buttons adjacent to buttonholes. Weave in all ends carefully.
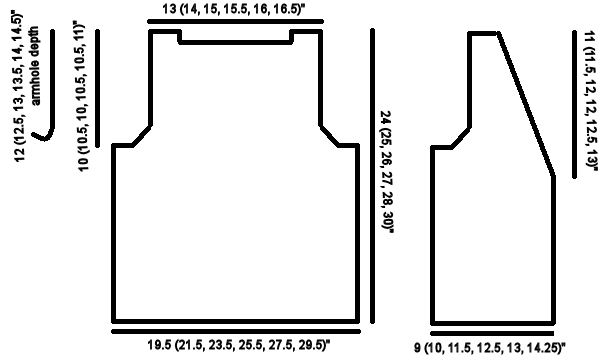
Schematics
Flat measurements after blocking. Armhole height will increase slightly when worn.
