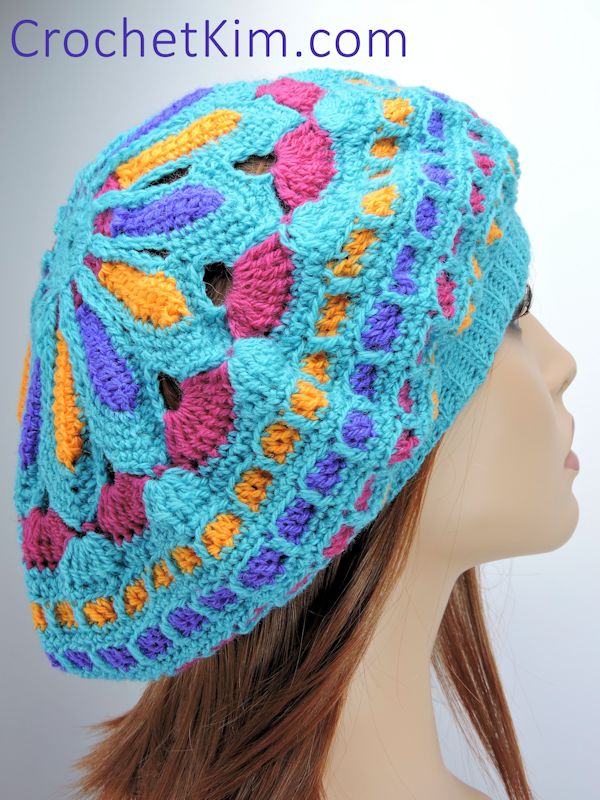
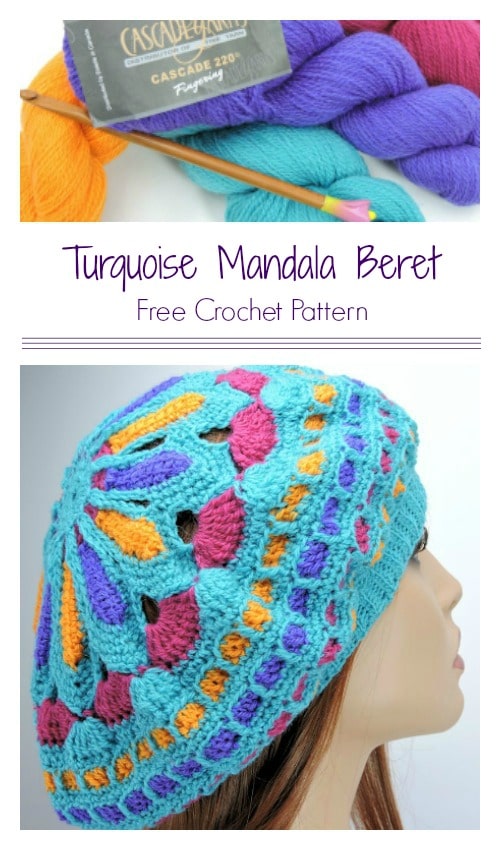
Have you fallen for crochet mandalas? Which ones have you made? I designed this one and then I turned it into this fabulous beret style hat. Isn’t it wonderful?!
I have some yarn ready to make more projects with this base. I can hardly wait to start.

Turquoise Mandala Slouchie Beanie
designed by Kim Guzman © July 2015
Please read my Terms of Use
Technique: Regular Crochet
Finished Size
Hat body 28″, brim 21″ (stretchy), height 8″
Materials
- Cascade 220 Fingering weight yarn (100% Peruvian Highland Wool, 273 yds per 50g): One hank of each color (or yardage specified):
- A: Color #9421 Blue Hawaii (approx. 200 yds)
- B: Color #7802 Cerise (approx. 60 yds)
- C: Color #7808 Purple Hyacinth (approx. 60 yds)
- D: Color #7825 Orange Sherbert (approx. 60 yds)
- Suggested hook: G-6 (4mm) (designated as “large” hook in pattern)
- Suggested hook: E-4 (3.5mm) (designated as “small” hook in pattern)
- Needle (for weaving ends)
Notes
Hat is worked top-down, brim is applied once the hat body is finished. Don’t expect this hat to look like a regular close-fitting beanie while working on it. No need to email me and say that “It looks so big.” It’s supposed to be that way. Check your gauge with a tape measure to be certain you are on track.
This project is based on my Turquoise Mandala Doily pattern, which you can find HERE.
Gauge
After round 4, approx. 2.25″ across
After round 9, approx. 7.25″ across
After round 15, approx. 10.25″ across
Pin It:
Special Stitches
Beginning Linked Treble Crochet (bltr): Sk first ch, [insert hook in next ch, yo, pull lp through] 3 times, [yo, pull through 2 lps on hook] 3 times.
Linked Treble Crochet (ltr): [Insert hook in horizontal bar on side of prev st, yo, pull lp through] 2 times, insert hook in next ch, yo, pull lp through, [yo, pull through 2 lps on hook] 3 times.
Crochet Pattern Instructions
Round 1: With larger hook and A, ch 4, join with sl st to first ch to form a ring, ch 1, 8 sc in ring, sl st to first sc. (stitch count: 8 sc)
Round 2: Ch 1, 2 sc in each sc around, sl st to first sc. (stitch count: 16 sc)
Round 3: Ch 1, [sc in sc, 2 sc in next sc] around. (stitch count: 24 sc) Fasten off A.
Round 4: With B, working in back loops only for this round, join with sl st in any sc, ch 3 (counts as dc here and throughout), dc in same sc as joining, *dc in next sc, 2 dc in next sc, rep from * to last sc, dc in last sc, sl st to top of beg ch-3. (stitch count: 36 dc) Fasten off B.
Round 5: With C, join with sl st in any dc, *ch 12, bltr, ltr in each remaining ch, sk 2 dc from round 4, sl st to next dc with D (9 ltr-petal made), drop C, now with D, rep from *, changing to C on sl st, continue repeating from * until 12 petals are created, alternating colors, ending with sl st in first sl st. Use care when changing colors so the strand in the back of the unused color does not cause “cupping” of the project. If you prefer not to have this little strand on the back, you can cut off each petal to change colors. Or, alternatively, work this round in only one color. (stitch count: 12 9-ltr petals created) Fasten off C and D.
Round 6: With A, join with sl st to bottom of any petal on foundation row side (where you did your initial ch 12), ch 1, *9 sc along side of petal, [2 sc in unused loop of chain at top of petal] 2 times, 9 sc along opposite side of petal, ch 3, sl st in unused corresponding front loop of sc of round 3, ch 3, rep from * around each of 12 petals, sl st to first sc.
Round 7: Sl st to 5th sc at side of petal, ch 1, *sc in next 6 sc, ch 1, sc in next 6 sc, sk 10 sc, rep from * until all petals completed, sl st to first sc.
Round 8: Ch 1, *sc in next 5 sc, 3 sc in ch-1 sp, sc in next 5 sc, sk 2 sc, rep from * until all petals completed, sl st to first sc.
Round 9: Sl st to next sc, ch 1, *sc in next 4 sc, 3 sc in next sc, sc in next 4 sc, ch 3, sk 4 sc, rep from * until all petals completed, sl st to first sc. Fasten off A.
Round 10: Join B with sl st in any ch-3 sp, ch 4 (counts as tr here and throughout), 8 tr in same ch 3 sp, *sc in 2nd sc of 3-sc group at top of petal, 9 tr in next ch-3 sp, rep from *, ending with sc in last petal, sl st to top of beginning ch-4. Fasten off B.
Round 11: Join A with sl st in any sc, ch 4, 6 tr in same sc, *sk tr, sc in next 7 tr, sk tr, 7 tr in sc at top of next petal, rep from * to last 9-tr group, sk tr, sc in next 7 tr, sk tr, sl st to top of beginning ch-4.
Round 12: Ch 1, sc in same tr as joining and in next 6 tr, *hdc in next 7 sc, sc in next 7 tr, rep from * ending with hdc in last 7 sc, sl st to first sc. Fasten off A.
Round 13: Working in back loops only for this round, join D with sl st in top of same beginning st of previous round, ch 3, sk joining st, dc in each st around, sl st to top of beginning ch-3. (stitch count: 168 dc) Fasten off D.
Round 14: Join A with sl st in top of same beginning ch-3, ch 1, sc in same joining st, sc in next 2 dc, *dc in corresponding unworked front loop of st from round below (in this round, you’re looking at the stitches in round 12), sk dc behind dc just worked, sc in next 3 dc, rep from * to last st, dc in corresponding unworked front loop of sc from round below, sk dc behind dc just worked, sl st to first sc.
Round 15: Ch 1, sc in each st around, sl st to first sc. (stitch count: 168 sc) Fasten off A.
Round 16: Working in back loops only for this round, join C with sl st in top of same sc as joining, ch 3, sk joining st, dc in each st around, sl st to top of beginning ch-3, (stitch count: 168 dc) Fasten off C.
Rounds 17-18: With A, rep rounds 14-15. Fasten off A.
Round 19: Working in back loops only for this round, join B with sl st in top of same sc as joining, ch 3, sk joining st, dc in each st around, sl st to top of beginning ch-3, (stitch count: 168 dc) Fasten off B.
Rounds 20-21: With A, rep rounds 14-15. Fasten off A.
Round 22: Working in back loops only for this round, join D with sl st in top of same sc as joining, ch 3, sk joining st, dc in each st around, sl st to top of beginning ch-3, (stitch count: 168 dc) Fasten off D.
Rounds 23-24: Rep rounds 14-15. Do not fasten off A.
Brim
Row 1: (Still attached to hat, ribbing is worked vertically along stitches of hat.) With smaller hook and A, ch 9, sc in second ch from hook and in next 7 ch, on hat body sk 2 sc from round 24, sl st in next st, turn ribbing.
Row 2: Working in back loops only, sc in 8 sc, turn ribbing.
Row 3: Ch 1, working in back loops only, sc in 8 sc, on hat body sk 2 sc from round 24, sl st in next st, turn ribbing.
Repeat rows 2-3 until all stitches used from round 24, fasten off.
Finishing
With yarn needle, seam Brim. Weave in all ends securely.